Android Clock Application
In this post I will start directly with the process of modifying the application we created in the
Getting Started Part.
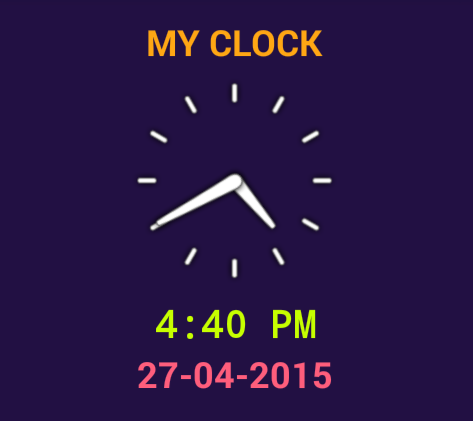
This application will be simple android application which will display Clock with Analog and display clock.
Open your activity_main.xml [res> layout> activity_main.xml] and edit it as following
<RelativeLayout xmlns:android="http://schemas.android.com/apk/res/android"
xmlns:tools="http://schemas.android.com/tools"
android:layout_width="match_parent"
android:layout_height="match_parent"
android:background="#ff221043"
android:paddingBottom="@dimen/activity_vertical_margin"
android:paddingLeft="@dimen/activity_horizontal_margin"
android:paddingRight="@dimen/activity_horizontal_margin"
android:paddingTop="@dimen/activity_vertical_margin"
tools:context=".MainActivity">

<TextView
android:id="@+id/txthelloworld"
android:layout_width="wrap_content"
android:layout_height="wrap_content"
android:layout_alignParentTop="true"
android:layout_centerHorizontal="true"
android:text="MY CLOCK"
android:textColor="#FFFFA714"
android:textSize="24sp"
android:textStyle="bold" />

<AnalogClock
android:id="@+id/analogclock1"
android:layout_width="match_parent"
android:layout_height="wrap_content"
android:layout_below="@+id/txthelloworld"
android:clickable="false" />

<DigitalClock
android:id="@+id/digitalClock1"
android:layout_width="match_parent"
android:layout_height="wrap_content"
android:layout_below="@+id/analogclock1"
android:layout_centerHorizontal="true"
android:gravity="center"
android:text="DigitalClock"
android:textColor="#FFC7FF00"
android:textSize="25sp"
android:textStyle="bold"
android:typeface="monospace" />

<TextView
android:id="@+id/txtdate"
android:layout_width="wrap_content"
android:layout_height="wrap_content"
android:layout_centerHorizontal="true"
android:textColor="#FFFF5E7C"
android:layout_below="@+id/digitalClock1"
android:textSize="24sp"
android:textStyle="bold" />
</RelativeLayout>
Here I am making use of
AnalogClock
DigitalClock
These two views are available in android. You just need to use them to make your clock.
And the TextView “txtdate “ is used to display the Date.
Now Open MainActivity.java.
Import :
import android.text.format.Time;
import android.view.Menu;
import android.view.MenuItem;
import android.widget.AnalogClock;
import android.widget.DigitalClock;
import android.widget.TextView;

import java.text.SimpleDateFormat;
import java.util.Calendar;
import java.util.Date;
Define following variables the start of the Activity class
public class MainActivity extends ActionBarActivity {

TextView txtdate;
Calendar calendar;
Date dates;
Time time;
String currentdate;
AnalogClock ac;
DigitalClock dc;
onCreate method is important as the variables you will be using in your application should be defined here.
@Override
protected void onCreate(Bundle savedInstanceState) {
super.onCreate(savedInstanceState);
setContentView(R.layout.activity_main);

ac = (AnalogClock) findViewById(R.id.analogclock1);
dc = (DigitalClock) findViewById(R.id.digitalClock1);
txtdate = (TextView) findViewById(R.id.txtdate);
time = new Time();
time.setToNow();
SimpleDateFormat sf = new SimpleDateFormat("dd-MM-yyyy"); // 04-05-2015
calendar = Calendar.getInstance();
currentdate = sf.format(calendar.getTime()); // getting current datetime of android.
txtdate.setText(currentdate);
}
Here I am making use of SimpleDateFormat to format the date and Calendar to get the Current Date.
You can refer Java Docs here to get an idea of Date formatting in JAVA.
JAVA DOCs
Here’s the complete code of MainActivity.java
package app.myfirstandroid.myfirstandroidapp;

import android.support.v7.app.ActionBarActivity;
import android.os.Bundle;
import android.text.format.Time;
import android.view.Menu;
import android.view.MenuItem;
import android.widget.AnalogClock;
import android.widget.DigitalClock;
import android.widget.TextView;

import java.text.SimpleDateFormat;
import java.util.Calendar;
import java.util.Date;

public class MainActivity extends ActionBarActivity {

TextView txtdate;
Calendar calendar;
Date dates;
Time time;
String currentdate;

@Override
protected void onCreate(Bundle savedInstanceState) {
super.onCreate(savedInstanceState);
setContentView(R.layout.activity_main);

AnalogClock ac = (AnalogClock) findViewById(R.id.analogclock1);

DigitalClock dc = (DigitalClock) findViewById(R.id.digitalClock1);
txtdate = (TextView) findViewById(R.id.txtdate);
time = new Time();
time.setToNow();
SimpleDateFormat sf = new SimpleDateFormat("dd-MM-yyyy");
calendar = Calendar.getInstance();
currentdate = sf.format(calendar.getTime());

txtdate.setText(currentdate);

}

@Override
public boolean onCreateOptionsMenu(Menu menu) {
// Inflate the menu; this adds items to the action bar if it is present.
getMenuInflater().inflate(R.menu.menu_main, menu);
return true;
}

@Override
public boolean onOptionsItemSelected(MenuItem item) {
// Handle action bar item clicks here. The action bar will
// automatically handle clicks on the Home/Up button, so long
// as you specify a parent activity in AndroidManifest.xml.
int id = item.getItemId();

//noinspection SimplifiableIfStatement
if (id == R.id.action_settings) {
return true;
}

return super.onOptionsItemSelected(item);
}
}
When you run this application you will result like this 🙂 🙂 🙂
