Hi friends,
In this post we will see how we can upload files in asp.net and save path into sql database. We will use a gridview to display the data and upload file from the database. This example uses a simple product table to save product name, description and its image. We will upload image for each product and display it to our users. So let’s start. DOWNLOAD SOURCE CODE
If you are just looking for code on how to upload files in asp.net :
Design:
<asp:FileUpload runat="server" ID="fileupload1" />
Code: Files is my folder in which files are uploaded.
String filePath = Server.MapPath("~/Files/" + fileupload1.FileName);
fileupload1.SaveAs(filePath);
In your ms sql database create a table with name tblproducts and stored procedure using the below db script:
create table tblProducts
(
ProductId int not null identity(1,1) primary key,
ProductName nvarchar(50) null,
ProductDesc nvarchar(50) null,
ProductImage nvarchar(100) null,
OnDate datetime default getDate()
)

create procedure AddProducts
(
@Name nvarchar(50), @Desc nvarchar(50), @Image nvarchar(100)
)
as
begin
insert into tblProducts (ProductName, ProductDesc, ProductImage) values (@Name,@Desc,@Image)
end
Create a new ASP.NET web form named uploadform.aspx and edit it as below:
uploadform.aspx:
<%@ Page Language="C#" AutoEventWireup="true" CodeBehind="uploadform.aspx.cs" Inherits="WebApplication1.uploadform" %>
<!DOCTYPE html>
<html xmlns="http://www.w3.org/1999/xhtml">
<head runat="server">
<title>ASP.NET Uploading Files</title>
<link href="bootstrap.min.css" rel="stylesheet" />

<style>
.mytable {
width: 50%;
margin: 10px;
}

body {
padding: 5px;
}
</style>
</head>
<body>
<form id="form1" runat="server">
<div>
<h2>ASP.NET - Upload files</h2>
<table class="table table-condensed mytable">
<tr>
<td>Product Name:
</td>
<td>
<asp:TextBox runat="server" ID="txtProductName" Width="150" />
</td>
</tr>
<tr>
<td>Product Description:
</td>
<td>
<asp:TextBox runat="server" ID="txtProductDescription" Width="150" />
</td>
</tr>
<tr>
<td>Product Image:
</td>
<td>
<asp:FileUpload runat="server" ID="fileupload1" />
</td>
</tr>
<tr>
<td colspan="2">
<asp:Button runat="server" ID="btnUpload" OnClick="btnUpload_Click" Text="Submit" CssClass="btn btn-success" />
</td>
</tr>
</table>
<asp:Label runat="server" ID="lblInfo" />
<asp:GridView runat="server" ID="gridviewProducts" UseAccessibleHeader="true" CssClass="table table-hover table-condensed mytable" AutoGenerateColumns="false">
<Columns>
<asp:BoundField HeaderText="Id" DataField="ProductId" />
<asp:BoundField HeaderText="Product name" DataField="ProductName" />
<asp:BoundField HeaderText="Description" DataField="ProductDesc" />
<asp:TemplateField HeaderText="Product Image">
<ItemTemplate>
<asp:Image ID="productimage" runat="server"
ImageUrl='<%# "~/Files/"+ Eval("ProductImage") %>' Width="100px" Height="100px" />
</ItemTemplate>

</asp:TemplateField>
</Columns>
</asp:GridView>
</div>
</form>
</body>
</html>
This form has two asp.net textboxes to enter the product name, description and an asp.net file upload control to allow users to add the files for a product. On pressing the submit button the selected file will be first uploaded to the “files” folder and its path will be saved in the sql database. On the page load method we will also load the data from our sql database to show the uploaded file on the gridview to the users.
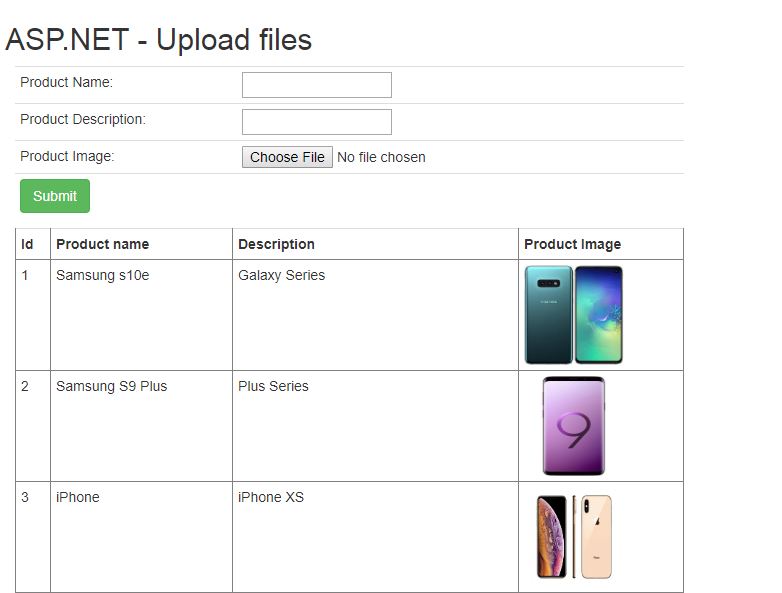
ASP.NET File Upload – Form 01
Now edit the code file as below:
uploadform.aspx.cs:
using System;
using System.Data;
using System.Data.SqlClient;
using System.IO;

namespace WebApplication1
{
public partial class uploadform : System.Web.UI.Page
{
SqlConnection con;
SqlDataAdapter adapter;
SqlCommand cmd;
static String connectionString = @"Data Source=192.168.100.45;Initial Catalog=ParallelCodes;User ID=sa;Password=789;Integrated Security=True;";

protected void Page_Load(object sender, EventArgs e)
{
FillGrid();
}

protected void btnUpload_Click(object sender, EventArgs e)
{
try
{
String filePath = Server.MapPath("~/Files/" + fileupload1.FileName);

fileupload1.SaveAs(filePath);
lblInfo.Text = "Your file was successfully uploaded to : Files/"
+ Path.GetFileName(fileupload1.FileName).ToString();

con = new SqlConnection(connectionString);
cmd = new SqlCommand();
con.Open();
cmd.Connection = con;
cmd.CommandType = System.Data.CommandType.StoredProcedure;
cmd.CommandText = "AddProducts";
cmd.Parameters.AddWithValue("@Name", txtProductName.Text.ToString());
cmd.Parameters.AddWithValue("@Desc", txtProductDescription.Text.ToString());
cmd.Parameters.AddWithValue("@Image", fileupload1.FileName);
cmd.ExecuteNonQuery();

cmd.Dispose();
con.Dispose();
con.Close();

lblInfo.Text = "Saved successfully.";

txtProductDescription.Text = "";
txtProductName.Text = "";

FillGrid();
}
catch (Exception ex)
{
lblInfo.Text = ex.Message.ToString();
}
}

public void FillGrid()
{
try
{
con = new SqlConnection(connectionString);
cmd = new SqlCommand();
con.Open();
cmd = new SqlCommand("Select * from tblproducts", con);
adapter = new SqlDataAdapter(cmd);
DataTable dt = new DataTable();
adapter.Fill(dt);

gridviewProducts.DataSource = dt;
gridviewProducts.DataBind();

cmd.Dispose();
con.Dispose();
con.Close();

}
catch (Exception ex)
{

}
}
}
}
Also see:
How to Upload File ASP.NET MVC with Database – Example
Angular JS Bind Grid Html Table from SQL in ASP.NET MVC C#.
Creating AngularJS Login form in MVC ASP.NET Forms C#.
How to Upload File ASP.NET MVC with Database.
How to upload files in ASP.NET?
How to download files in ASP.NET?
ASP.NET Gridview CSS design using Bootstrap.