
Let’s create a simple MVC Login Page with SQL Database and simple MVC Validations. The application will have two basic textboxes required for getting userid and password from the user and a MVC Input Button for calling the Login method.
DOWNLOAD SOURCE CODE FOR THIS APP.

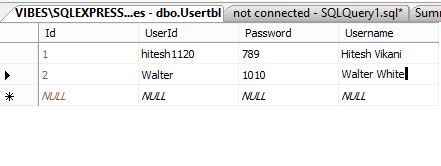
My MS SQL Database Table for UserInfo :
Usertbl –
Now let’s create our Login Page.
Step 1 : Create a new ASP.NET MVC Project with Razor View Engine. I’m using MVC 4 for this Project.
Step 2 : Create a new Model class name User.cs in Model folder of your MVC Project and edit it as below.
Model > User.cs :
using System;
using System.Collections.Generic;
using System.ComponentModel.DataAnnotations;
using System.Configuration;
using System.Data.SqlClient;
using System.Linq;
using System.Web;

namespace MvcApplication1.Models
{
public class User
{

[Required(ErrorMessage = "Please enter your User ID.")]
[Display(Name = "Username : ")]
public string UserId { get; set; }

[DataType(DataType.Password)]
[Required(ErrorMessage = "Please enter your Password.")]
[Display(Name = "Password : ")]
public string Password { get; set; }

public string UserName { get; set; }

//This method validates the Login credentials
public String LoginProcess(String strUsername, String strPassword)
{
String message = "";
//my connection string
SqlConnection con = new SqlConnection(ConfigurationManager.ConnectionStrings["connectionString"].ConnectionString);
SqlCommand cmd = new SqlCommand("Select * from Usertbl where UserId=@Username", con);
cmd.Parameters.AddWithValue("@Username", strUsername);
try
{
con.Open();
SqlDataReader reader = cmd.ExecuteReader();
if (reader.Read())
{
Boolean login = (strPassword.Equals(reader["Password"].ToString(), StringComparison.InvariantCulture)) ? true : false;
if (login)
{
message = "1";
UserName = reader["UserName"].ToString();

}
else
message = "Invalid Credentials";
}
else
message = "Invalid Credentials";

reader.Close();
reader.Dispose();
cmd.Dispose();
con.Close();
}
catch (Exception ex)
{
message = ex.Message.ToString() + "Error.";

}
return message;
}

}
}
This class declares all the necessary String (get; set;) variables and a method named LoginProcess which accepts two parameters named : UserId and Password with return value of String variable. The returning String will change as per the Login process result which is parsed in the Controller method.
Step 3 : Create a new Controller named UserLoginController.cs in your Controllers folder. (Note : Please type the name only as UserLogin as Visual Studio will append Controller automatically).
Controllers > UserLoginController.cs:
using System;
using System.Collections.Generic;
using System.Linq;
using System.Web;
using System.Web.Mvc;
using MvcApplication1.Models;
namespace MvcApplication1.Controllers
{
public class UserLoginController : Controller
{
//
// GET: /UserLogin/

public ActionResult Index()
{
return View();
}

[HttpGet]
public ActionResult UserLogin()
{
return View();
}

//This the Login method. It passes a object of my Model Class named "User".
[HttpPost]
public ActionResult UserLogin(User users)
{
if (ModelState.IsValid)
{
//message will collect the String value from the model method.
String message = users.LoginProcess(users.UserId, users.Password);
//RedirectToAction("actionName/ViewName_ActionResultMethodName", "ControllerName");
if (message.Equals("1"))
{
//this will add cookies for the username.
Response.Cookies.Add(new HttpCookie("Users1", users.UserName));
//This is a different Controller for the User Homepage. Redirecting after successful process.
return RedirectToAction("Home", "UserHome");
}
else
ViewBag.ErrorMessage = message;
}
return View(users);
}

}
}
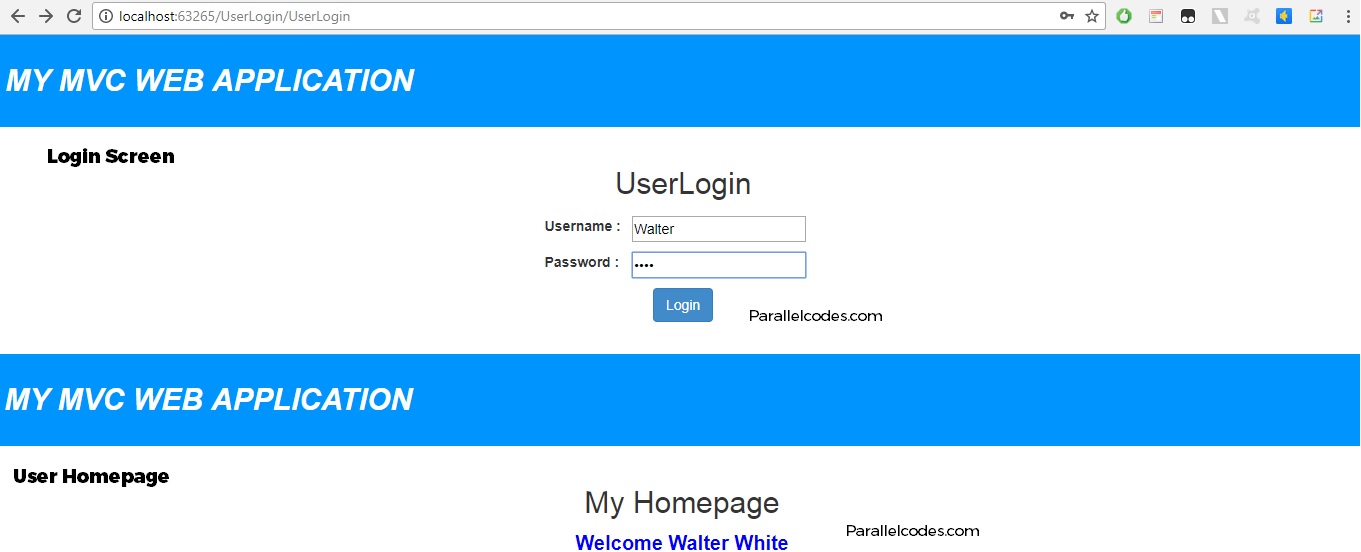
If the login process is successful, it will redirect it the Homepage of the User.
Now add a View to our Controller method for displaying the login page :

Right Click on the UserLogin method and Click add View option and name the View as UserLogin.
And Edit it as below.
View > UserLogin > UserLogin.cshtml:
@model MvcApplication1.Models.User
@{
ViewBag.Title = "UserLogin";
Layout = "~/Views/Layout/_webLayout.cshtml";
}
<h2>UserLogin</h2>
@using (Html.BeginForm())
{
<table width="100%">
<tr>
<td align="center">
<table class="table-condensed">
<tr>
<td align="left">
@Html.LabelFor(m => m.UserId)
</td>
<td align="right">
@Html.TextBoxFor(m => m.UserId)
<br />
@Html.ValidationMessageFor(m => m.UserId)
</td>
</tr>
<tr>
<td align="left">
@Html.LabelFor(m => m.Password)
</td>
<td align="right">
@Html.EditorFor(m => m.Password, new { htmlAttributes = new { @class = "form-control", placeholder = "Password" } })
<br />
@Html.ValidationMessageFor(m => m.Password)
</td>
</tr>
<tr>
<td colspan="2" align="center">
<input type="submit" value="Login" class="btn btn-primary" />
</td>
</tr>
</table>
<br />
<br />
@ViewBag.ErrorMessage;
</td>
</tr>
</table>
}
Step 4 : Creating the User HomePage.
Now Add a new Controller with name UserHomeController.cs and edit it as following :
Controllers > UserHomeController.cs :
using System;
using System.Collections.Generic;
using System.Linq;
using System.Web;
using System.Web.Mvc;

namespace MvcApplication1.Controllers
{
public class UserHomeController : Controller
{
//
// GET: /UserHome/

public ActionResult Index()
{
return View();
}

public ActionResult Home()
{
return View();
}

}
}
And create its View with name Home.cshtml. And edit it as below :
Views > UserHome > Home.cshtml :
@model MvcApplication1.Models.User
@{
ViewBag.Title = "UserHome";
Layout = "~/Views/Layout/_webLayout.cshtml";
}

<h2>My Homepage</h2>

@*//This will display the username from the cookies to the user.*@
<b><span style="color:blue;font-size:20px;">Welcome @Request.Cookies["Users1"].Value.ToString()</span></b>
Step 5 : Create a MasterPage for our MVC Login Application.
Create a new Folder named “Layout” in the Views folder and create a new layout html page in it. And Edit it as below:
Views > Layout > _webLayout.cshtml:
@{
Layout = null;
}
<!DOCTYPE html>

<html>
<head>
<meta name="viewport" content="width=device-width" />
<title>My MVC Application</title>
<link href="~/Content/bootstrap.css" rel="stylesheet" />
</head>
<body style="font-family: Arial; width: 100%; height: 100%;">
<div style="background-color: #0094ff; color: #fff; font-weight: bold; padding: 25px 5px; font-size: 30px; font-style: italic">
MY MVC WEB APPLICATION
</div>
<br />
<div style="width:100%;text-align:center;">

@RenderBody()
</div>
</body>
</html>
Inside the Content folder of your application solution, copy the bootstrap.css as below (You can download using this Link) :
DOWNLOAD SOURCE CODE FOR THIS APP.
Output :
ASP.NET MVC Cookie Add and Retrieve Example with source code download
Also see:
How to upload files in ASP.NET MVC and save in Database.
Binding Angular JS Bind HTML table from SQL in ASP.NET MVC C#
Bind|Populate ASP.NET MVC C# Dropdownlist from SQL
C# ASP.NET MVC Add and Retrieve Cookies
Creating a Login Page in ASP.NET MVC C# using SQL table and Razor
Creating a Registration page in ASP.NET C#