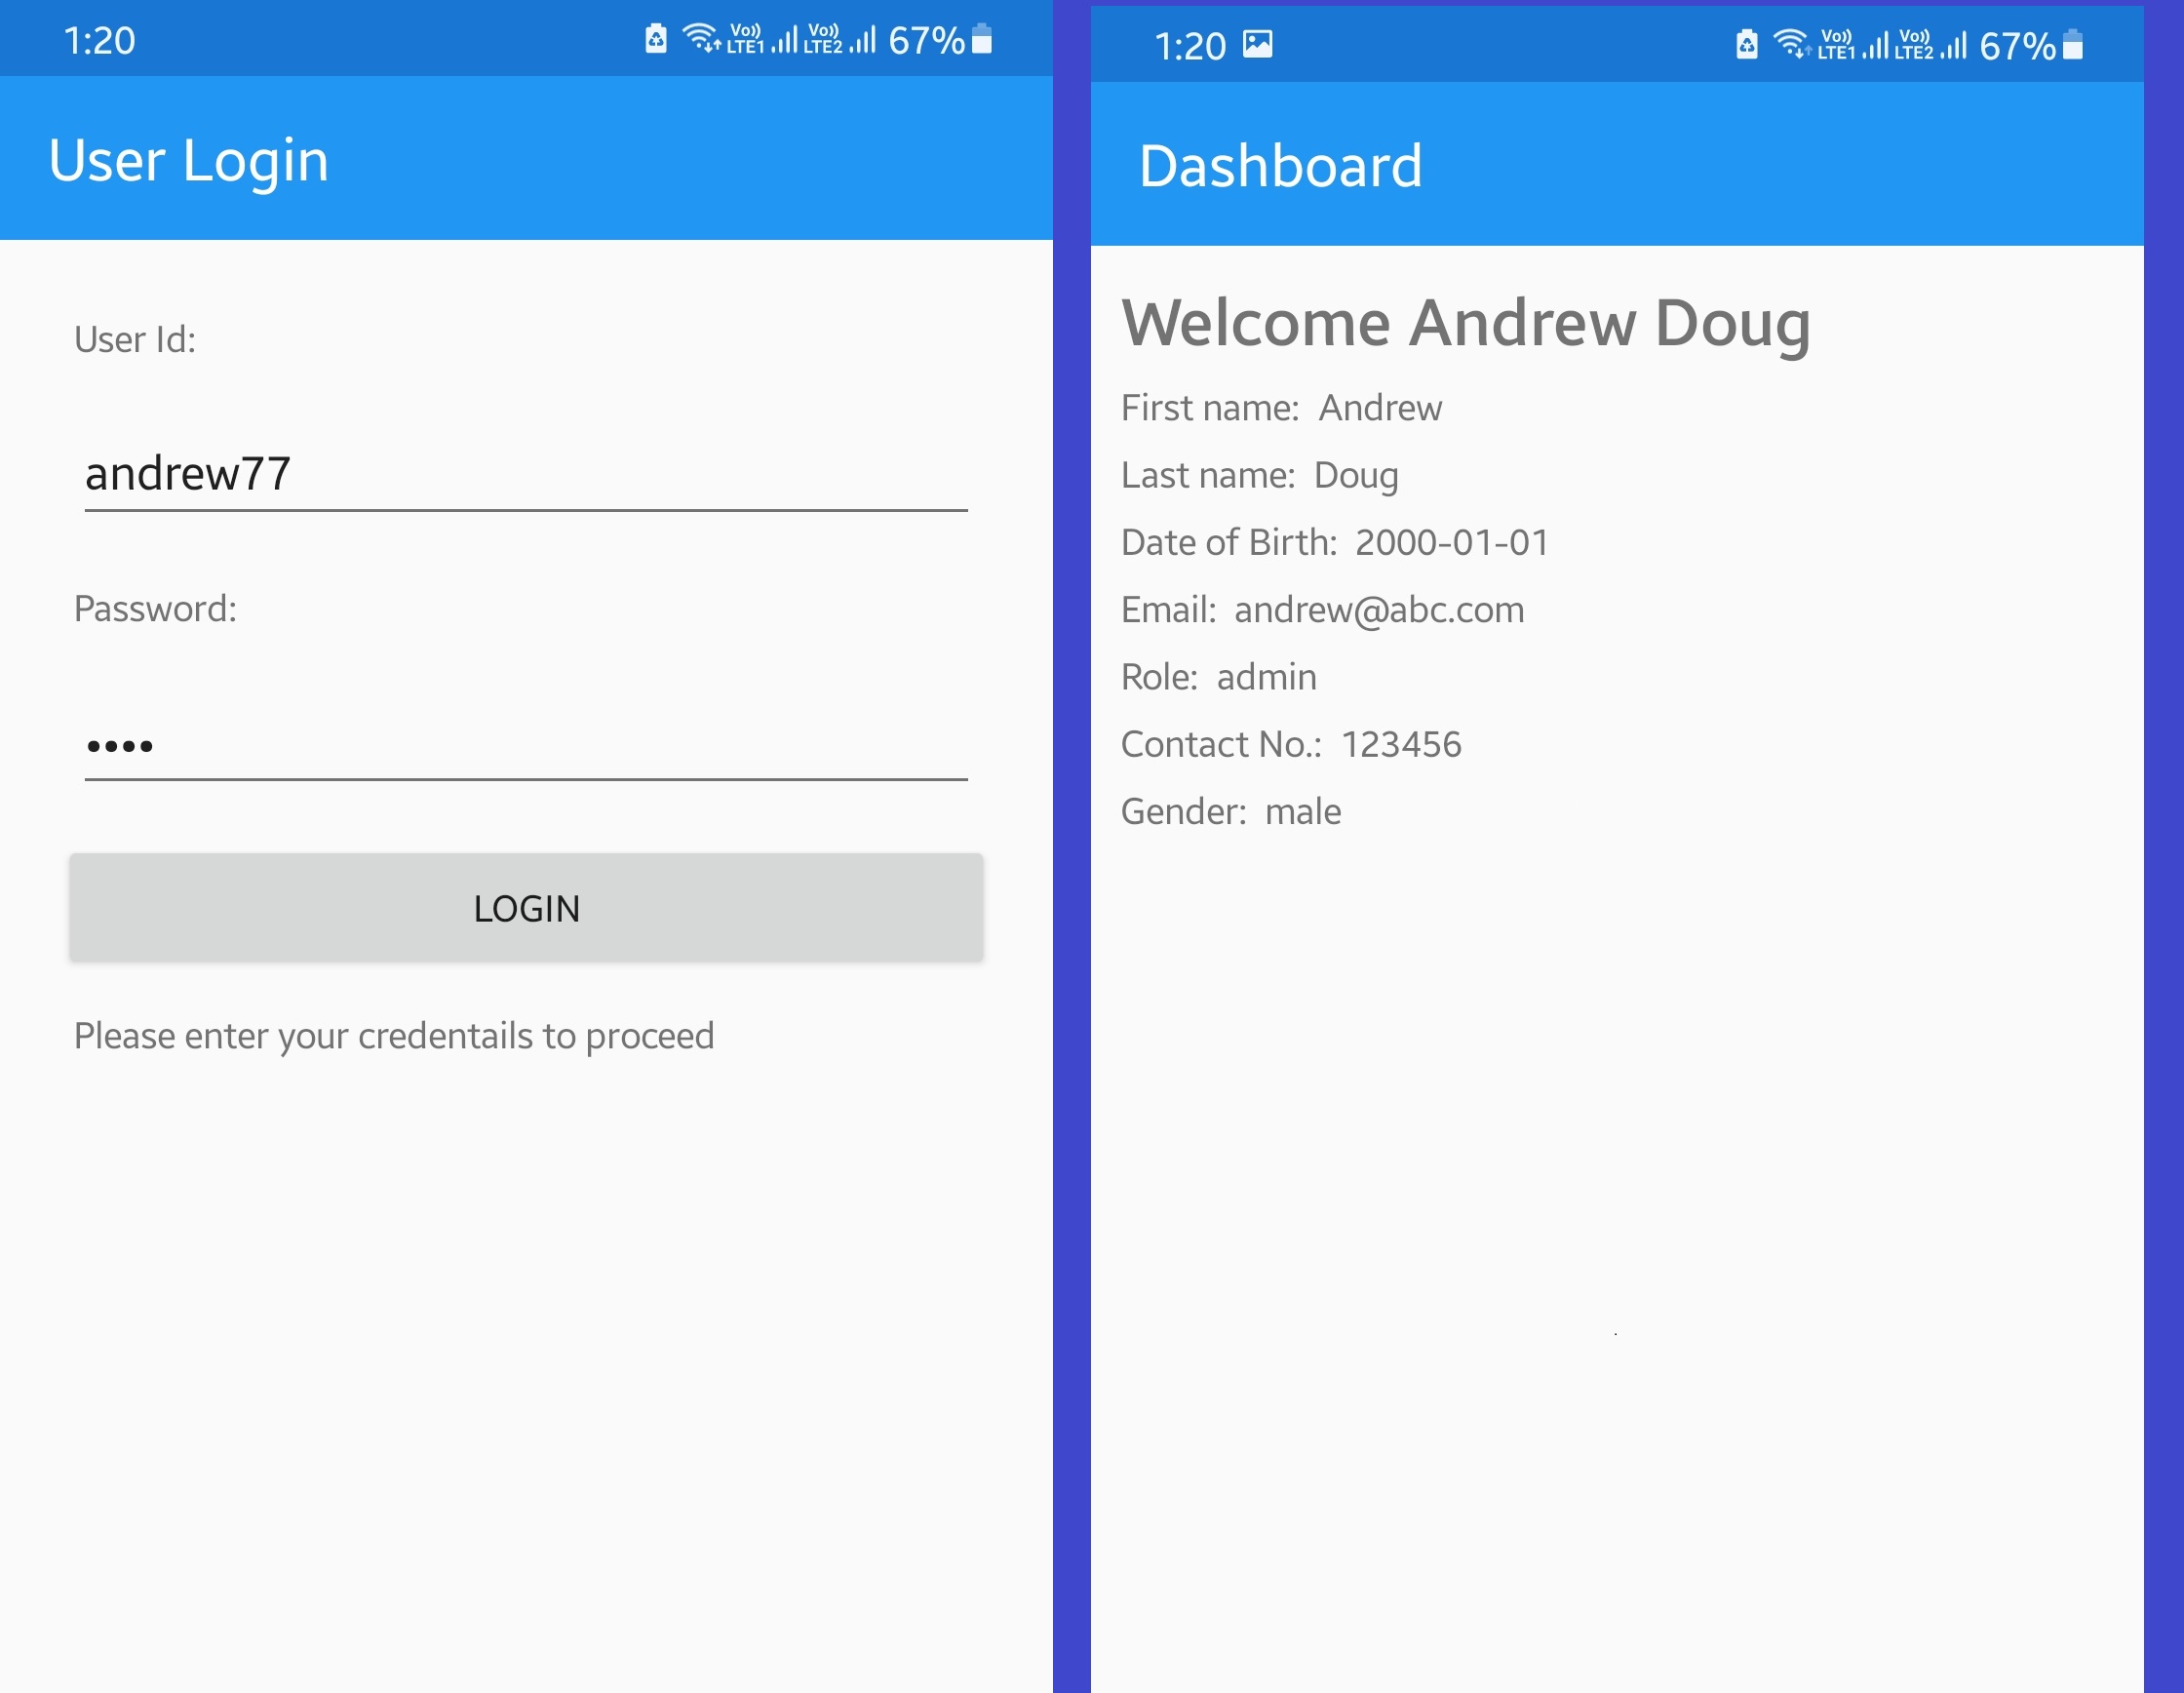
In this post we will check how to call Web API in Xamarin forms. We will create a login app in Xamarin forms and bind the login process with the Web API. In the previous post we saw how to bind the button in MVVM architecture in Xamarin forms.
The Login Web API is created using .net core. You can find a complete post on this: Creating Login API in .NET Core
Sample Output of the API:
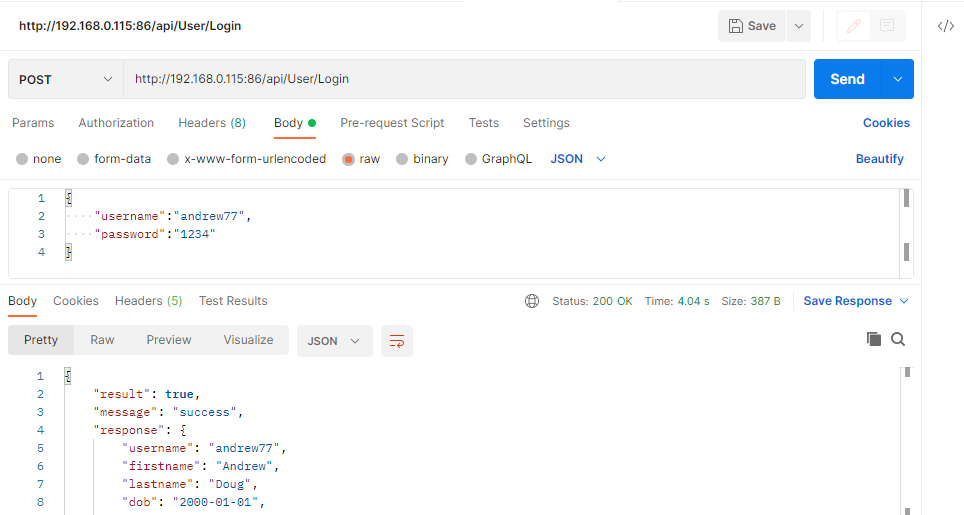
API response:
{
"result": true,
"message": "success",
"response": {
"username": "andrew77",
"firstname": "Andrew",
"lastname": "Doug",
"dob": "2000-01-01",
"email": "andrew@abc.com",
"role": "admin",
"contactno": "123456",
"gender": "male"
}
}
Let’s start with our Xamarin Forms app then.
Creating Helpers
Create a folder in your project with name Helpers. Inside the folder we will create files which we can use for common methods throughout our project.
Create a class with name APIHelper.cs and edit it as below.
APIHelper.cs:
namespace App1.Helpers
{
public class APIHelper
{
public static string url = "http://192.168.0.115:86/";
public static string loginAPI = url + "api/User/Login";
public static string logoutAPI = "";
}
}
Now create a class with name HttpHelper.cs, this class will contains method to call web APIs and get a response.
HttpHelper.cs:
using App1.Models;
using Newtonsoft.Json;
using System;
using System.Collections.Generic;
using System.Net.Http;
using System.Text;
using System.Threading.Tasks;

namespace App1.Helpers
{
public class HttpHelper
{

public async Task<APIResponse> callAPI(string url,string json)
{
APIResponse res = new APIResponse();
try
{
string content = string.Empty;
var httpClient = new HttpClient();
HttpResponseMessage httpResponse = null;
if (String.IsNullOrWhiteSpace(json))
{
httpResponse = await httpClient.GetAsync(url);
}
else
{
var httpContent = new StringContent(json, Encoding.UTF8, "application/json");
httpResponse = await httpClient.PostAsync(url, httpContent);

}

if (httpResponse.IsSuccessStatusCode)
{
content = await httpResponse.Content.ReadAsStringAsync();
res = JsonConvert.DeserializeObject<APIResponse>(content);
}
else
{
res.response = null;
res.message = "Invalid Response";
res.result = false;
}

return res;
}
catch (Exception ex)
{
res.response = ex.Message.ToString();
res.message = "Invalid Response";
res.result = false;
return res;
}
}

}
}
We will need one class for negating the boolean variable on our xaml file.
IValueConverter.cs:
using System;
using Xamarin.Forms;

namespace App1.Helpers
{
public class InverseBoolConverter : IValueConverter
{
public object Convert(object value, Type targetType, object parameter, System.Globalization.CultureInfo culture)
{
return !(bool)value;
}
public object ConvertBack(object value, Type targetType, object parameter, System.Globalization.CultureInfo culture)
{
return !(bool)value;
}
}
}
This class will help us in achieving our goal of negating the boolean value. On the login app we need to show the Activity Indicator and also hide the login button. For this we will use only one bool value from the view model and bind it on both the controls with one having opposite value i.e. Negative value of the actual value.
Creating Models
Now let’s create the model classes.
First create a model class with name APIResponse.cs This class will be the class object for our API response.
APIResponse.cs:
namespace App1.Models
{
public class APIResponse
{
public bool result { get; set; }
public string message { get; set; }
public object response { get; set; }
}
}
Create a class with name Users.cs. This class will be used to send class object to Login API and also the response will be parsed using it.
Users.cs:
namespace App1.Models
{
public class Users
{
public string username { get; set; }
public string password { get; set; }
}

public class UserDetails
{
public string username { get; set; }
public string firstname { get; set; }
public string lastname { get; set; }
public string dob { get; set; }
public string email { get; set; }
public string role { get; set; }
public string contactno { get; set; }
public string gender { get; set; }
public string message { get; set; }
}

public class Result
{
public bool result { get; set; }
public string message { get; set; }
}
}
Creating ViewModels
Let’s start now to create the ViewModels. Create a class with name BaseViewModel.cs and edit it as below.
BaseViewModel.cs:
using System;
using System.Collections.Generic;
using System.ComponentModel;
using System.Runtime.CompilerServices;

namespace XamSamples.ViewModels
{
public class BaseViewModel : INotifyPropertyChanged
{

public virtual void OnAppearing()
{
}

protected bool SetProperty<T>(ref T backingStore, T value,
[CallerMemberName] string propertyName = "",
Action onChanged = null)
{
if (EqualityComparer<T>.Default.Equals(backingStore, value))
return false;

backingStore = value;
onChanged?.Invoke();
OnPropertyChanged(propertyName);
return true;
}

#region INotifyPropertyChanged
public event PropertyChangedEventHandler PropertyChanged;
protected void OnPropertyChanged([CallerMemberName] string propertyName = "")
{
var changed = PropertyChanged;
if (changed == null)
return;

changed.Invoke(this, new PropertyChangedEventArgs(propertyName));
}
#endregion

}
}
This class will be inherited by the rest two viewmodels as shown below.
VMDashboard.cs:
using App1.Models;

namespace App1.ViewModels
{
public class VMDashboard : BaseViewModel
{

private UserDetails _userDetails { get; set; }

public UserDetails userDetails
{
get { return _userDetails; }
set
{
_userDetails = value;
OnPropertyChanged();
}
}
public VMDashboard(UserDetails detail)
{
userDetails = detail;

userDetails.message = "Welcome "+ detail.firstname + " " + detail.lastname;
}

}
}
This view model is for our Dashboard page. This page would appear once we get a proper and success response from the Web API call, i.e. if the user login is successful.
VMLogin.cs:
using App1.Helpers;
using App1.Models;
using App1.Views;
using Newtonsoft.Json;
using System;
using System.Threading.Tasks;
using System.Windows.Input;
using Xamarin.Forms;

namespace App1.ViewModels
{
public class VMLogin : BaseViewModel
{
public ICommand btnLogin { get; set; }
private Users _users { get; set; }

private string _message { get; set; }
public string message
{
get
{ return _message; }
set
{
_message = value;
OnPropertyChanged();
}
}

public Users users
{
get { return _users; }
set
{
_users = value;
OnPropertyChanged();
}
}

private bool _isActivity { get; set; }

public bool isActivity
{
get { return _isActivity; }
set
{
_isActivity = value;
OnPropertyChanged();
}
}
public VMLogin()
{
users = new Users();
users.username = "";
message = "Please enter your credentails to proceed";
btnLogin = new Command(async () => await userLogin());
}

private async Task userLogin()
{
try
{
string webURL = APIHelper.loginAPI;
HttpHelper httpHelper = new HttpHelper();
isActivity = true;
APIResponse res = await httpHelper.callAPI(webURL, JsonConvert.SerializeObject(users));
isActivity = false;
if (res.result)
{
UserDetails details = new UserDetails();
string obj = JsonConvert.SerializeObject(res.response);
details = JsonConvert.DeserializeObject<UserDetails>(obj);
Application.Current.MainPage = new NavigationPage(new Dashboard(details));
}
else
message = res.message;

isActivity = false;
}
catch (Exception ex)
{
isActivity = false;
message = ex.Message.ToString();
}
}
}
}
This will be the View Model class for our login page. Here, we are calling the web API for doing the user login process and taking actions as per the response received.
Creating ViewModels
We will now create the views for our app. Create the below 2 layout files and edit its classes as shown below.
Dashboard.xaml:
<?xml version="1.0" encoding="utf-8" ?>
<ContentPage xmlns="http://xamarin.com/schemas/2014/forms"
xmlns:x="http://schemas.microsoft.com/winfx/2009/xaml"
x:Class="App1.Views.Dashboard"
Title="Dashboard">
<ContentPage.Content>
<StackLayout HorizontalOptions="FillAndExpand" VerticalOptions="FillAndExpand"
Orientation="Vertical" Padding="10">

<Label x:Name="lblName" Text="{Binding userDetails.message}" FontAttributes="Bold" FontSize="25"/>

<StackLayout Orientation="Horizontal" >
<Label Text="First name:" />
<Label Text="{Binding userDetails.firstname}" />
</StackLayout>

<StackLayout Orientation="Horizontal" >
<Label Text="Last name:" />
<Label Text="{Binding userDetails.lastname}" />
</StackLayout>

<StackLayout Orientation="Horizontal" >
<Label Text="Date of Birth:"/>
<Label Text="{Binding userDetails.dob}"/>
</StackLayout>

<StackLayout Orientation="Horizontal" >
<Label Text="Email:"/>
<Label Text="{Binding userDetails.email}"/>
</StackLayout>

<StackLayout Orientation="Horizontal" >
<Label Text="Role:" />
<Label Text="{Binding userDetails.role}"/>
</StackLayout>

<StackLayout Orientation="Horizontal">
<Label Text="Contact No.:"/>
<Label Text="{Binding userDetails.contactno}"/>
</StackLayout>

<StackLayout Orientation="Horizontal" >
<Label Text="Gender:"/>
<Label Text="{Binding userDetails.gender}"/>
</StackLayout>

</StackLayout>
</ContentPage.Content>
</ContentPage>
Dashboard.xaml.cs:
using App1.Models;
using App1.ViewModels;
using Xamarin.Forms;
using Xamarin.Forms.Xaml;

namespace App1.Views
{
[XamlCompilation(XamlCompilationOptions.Compile)]
public partial class Dashboard : ContentPage
{
VMDashboard vmDashboard;
public Dashboard(UserDetails userDetails)
{
InitializeComponent();
vmDashboard = new VMDashboard(userDetails);
BindingContext = vmDashboard;
}
}
}
Login.xaml:
<?xml version="1.0" encoding="utf-8" ?>
<ContentPage xmlns="http://xamarin.com/schemas/2014/forms"
xmlns:x="http://schemas.microsoft.com/winfx/2009/xaml"
x:Class="App1.Login"
xmlns:Helpers="clr-namespace:App1.Helpers"
Title="User Login">

<ContentPage.Resources>
<Helpers:InverseBoolConverter x:Key="boolConverter"/>
</ContentPage.Resources>
<ContentPage.Content>
<StackLayout HorizontalOptions="FillAndExpand" VerticalOptions="FillAndExpand"
Padding="20" Orientation="Vertical">

<Label Text="User Id:" Margin="5"/>
<Entry x:Name="txtUserId" HorizontalOptions="FillAndExpand" Margin="5"
Text="{Binding users.username, Mode=TwoWay}"/>

<Label Text="Password:" Margin="5"/>
<Entry x:Name="txtPassword" IsPassword="True" HorizontalOptions="FillAndExpand" Margin="5"
Text="{Binding users.password, Mode=TwoWay}"/>

<Button x:Name="btnLogin" Text="Login" Command="{Binding btnLogin}"
IsEnabled="{Binding isActivity, Converter={StaticResource boolConverter}}"
IsVisible="{Binding isActivity, Converter={StaticResource boolConverter}}" />
<ActivityIndicator IsRunning="{Binding isActivity}" IsVisible="{Binding isActivity}" Margin="5"
HorizontalOptions="Center" />
<Label Text="{Binding message, Mode=TwoWay}" Margin="5" />
</StackLayout>
</ContentPage.Content>
</ContentPage>
Login.xaml.cs:
using App1.ViewModels;
using Xamarin.Forms;
using Xamarin.Forms.Xaml;

namespace App1
{
[XamlCompilation(XamlCompilationOptions.Compile)]
public partial class Login : ContentPage
{
VMLogin vmLogin;
public Login()
{
InitializeComponent();
vmLogin=new VMLogin();
BindingContext = vmLogin;
}

}
}
Change the start page of our app from App.xaml.cs file as below.
App.xaml.cs:
using Xamarin.Forms;

namespace App1
{
public partial class App : Application
{

public App()
{
InitializeComponent();

MainPage =new NavigationPage(new Login());
}

protected override void OnStart()
{
}

protected override void OnSleep()
{
}

protected override void OnResume()
{
}
}
}
Now run the app.