
Xamarin forms SQLite CRUD Operations: In previous post on we have seen How to Create and Add Data in SQLite database. In this post we will implement Create,Read,Update and Delete (CRUD) data functionality in local SQLite DB in Xamarin forms application.
For using SQLite database you will need to
install sqlite-net-pcl nuget package in your project.

This package library will help us in creating SQLite database and performing CRUD operations on our app. Application will contain two forms
- ProductPage.xaml – For Displaying Products in SQLite database
- AddProduct.xaml – For Adding, Updating and Deleting Products in the database.
My Project structure:
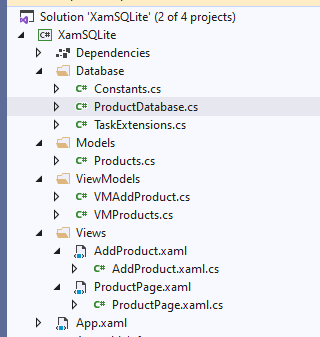
Create a folder in your project with name Database and add following classes inside of this folder.
Constants.cs:
using System;
using System.Collections.Generic;
using System.IO;
using System.Text;

namespace XamSQLite.Database
{
public class Constants

{
public const string dbName = "Products.db3";

public const SQLite.SQLiteOpenFlags Flags = SQLite.SQLiteOpenFlags.ReadWrite |
SQLite.SQLiteOpenFlags.Create | SQLite.SQLiteOpenFlags.SharedCache;

public static string DatabasePath
{
get
{
var basePath = Environment.GetFolderPath(Environment.SpecialFolder.LocalApplicationData);
return Path.Combine(basePath, dbName);
}
}

}
}
This class contains the name and file path of our SQLite database. You can change location of the database by editing DatabasePath string as per your requirements.
TaskExtensions.cs:
using System;
using System.Threading.Tasks;

namespace XamSQLite.Database
{
public static class TaskExtensions
{
public static async void SafeFireAndForget(this Task task,
bool returnToCallingContext,
Action<Exception> onException = null)
{
try
{
await task.ConfigureAwait(returnToCallingContext);
}

catch (Exception ex) when (onException != null)
{
onException(ex);
}
}
}
}
TaskExtensions class will help in creating a database connection in a asynchronous form. This class is being called from the main class below, where we are initializing the SQLite connection object.
ProductDatabase.cs:
using SQLite;
using System;
using System.Collections.Generic;
using System.Linq;
using System.Text;
using System.Threading.Tasks;
using XamSQLite.Models;

namespace XamSQLite.Database
{
public class ProductDatabase
{
static readonly Lazy<SQLiteAsyncConnection> lazyInitializer = new Lazy<SQLiteAsyncConnection>(() =>
{
return new SQLiteAsyncConnection(Constants.DatabasePath, Constants.Flags);
});

static SQLiteAsyncConnection Database => lazyInitializer.Value;
static bool initialized = false;

public ProductDatabase()
{
InitializeAsync().SafeFireAndForget(false);
}

async Task InitializeAsync()
{
if (!initialized)
{
if (!Database.TableMappings.Any(m => m.MappedType.Name == typeof(Products).Name))
await Database.CreateTablesAsync(CreateFlags.None, typeof(Products)).ConfigureAwait(false);

initialized = true;
}
}

public Task<List<Products>> getProducts()
{
return Database.Table<Products>().ToListAsync();
}

public Task<int> saveProduct(Products product)
{
if (product.ID == 0)
return Database.InsertAsync(product);
else
return Database.UpdateAsync(product);
}

public Task<int> deleteProduct(Products product)
{
return Database.DeleteAsync(product);
}
}
}
This class will create SQLite connection and the table of our Model class (Product.cs) which we are using. The SQLite.NET provides us with Object Relational Mapping (ORM) that allows us to store and retrieve objects without writing SQL statements. You can use SQLite queries also. But here I’m using its inbuilt functionality. The saveProduct() function accepts Products class object to add or update item in the database. It checks on the basis of ProductID. We will pass ProductID for update operation. The deleteProduct() function deletes a product item from the database, which is passed to it.
Now create a folder named Models (MVVM structure) and create following model class inside of it.
Models > Products.cs:
using SQLite;

namespace XamSQLite.Models
{
public class Products
{
[PrimaryKey,AutoIncrement]
public int ID { get; set; }
public string Name { get; set; }
public double Price { get; set; }
public int Quantity { get; set; }

}
}
This is our database class and it is also used it ViewModel.
Now create Views folder (MVVM structure) and create following ContentLayout files:
Views > ProductPage.xaml:
<?xml version="1.0" encoding="utf-8" ?>
<ContentPage xmlns="http://xamarin.com/schemas/2014/forms"
xmlns:x="http://schemas.microsoft.com/winfx/2009/xaml"
x:Class="XamSQLite.Views.ProductPage"
Visual="Material"
Title="Products"
Background="White">
<ContentPage.Content>
<Grid HorizontalOptions="FillAndExpand" VerticalOptions="FillAndExpand">
<Grid.RowDefinitions>
<RowDefinition Height="8*"/>
<RowDefinition Height="1*"/>
<RowDefinition Height="1*"/>
</Grid.RowDefinitions>
<ListView x:Name="lstProduct" ItemsSource="{Binding lstProducts}"
BackgroundColor="Transparent" HasUnevenRows="True"
RowHeight="100" SeparatorColor="Black" SeparatorVisibility="Default"
Grid.Row="0" Grid.Column="0" Margin="2" ItemSelected="lstProduct_ItemSelected">
<ListView.ItemTemplate>
<DataTemplate>
<ViewCell>
<Grid>

<Grid.ColumnDefinitions>
<ColumnDefinition Width="8*"/>
<ColumnDefinition Width="2*"/>
</Grid.ColumnDefinitions>
<Button BackgroundColor="#fff" TextColor="#eb3449"
HorizontalOptions="Center" VerticalOptions="FillAndExpand"
Grid.Column="1" x:Name="btnDeleteProduct"
Clicked="btnDeleteProduct_Clicked"
CommandParameter="{Binding ID}" Text="X" FontSize="20"/>
<StackLayout HorizontalOptions="FillAndExpand" Margin="0"
VerticalOptions="StartAndExpand" Grid.Column="0">

<StackLayout Margin="1" Orientation="Horizontal"
HorizontalOptions="FillAndExpand"
VerticalOptions="Start">
<Label Text="Product: " Margin="1" />
<Label Text="{Binding Name}" VerticalTextAlignment="Center"
FontAttributes="Bold"
HorizontalOptions="StartAndExpand"/>

</StackLayout>

<StackLayout Margin="1" Orientation="Horizontal"
HorizontalOptions="FillAndExpand"
VerticalOptions="Start">
<Label Text="Price: " Margin="1" />
<Label Text="{Binding Price}" VerticalTextAlignment="Center"
FontAttributes="Bold"
HorizontalOptions="StartAndExpand"/>
</StackLayout>

<StackLayout Orientation="Horizontal"
HorizontalOptions="FillAndExpand"
VerticalOptions="Start" Margin="1,1,1,3">
<Label Text="Qty: " Margin="1" />
<Label Text="{Binding Quantity}" VerticalTextAlignment="Center"
FontAttributes="Bold"
HorizontalOptions="StartAndExpand"/>
</StackLayout>

</StackLayout>
</Grid>

</ViewCell>
</DataTemplate>
</ListView.ItemTemplate>
</ListView>

<Label Text="{Binding lblInfo}" Grid.Row="1" Grid.Column="0"
Margin="2"/>
<Button x:Name="btnAddProduct" Text="Add New Product" Clicked="btnAddProduct_Clicked"
Margin="2"
Grid.Row="2" Grid.Column="0" BackgroundColor="#ff6633" TextColor="#fff"/>

</Grid>
</ContentPage.Content>
</ContentPage>
This form will display records from the database and also give an option to delete the records stored in the database. Upon click on any items in the ListView, it will open up next form to update that item stored in the SQLite database. At the bottom this page has Add New Product button to navigate to form for adding new entry to the database.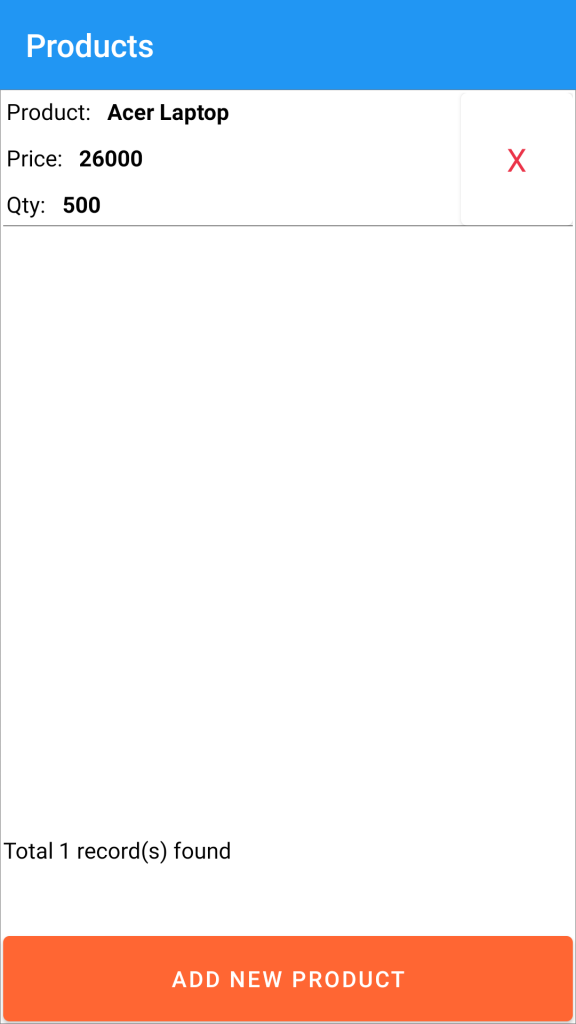
Edit the code-behind like below:
Views > ProductPage.xaml > ProductPage.xaml.cs:
using System;
using System.Linq;
using Xamarin.Forms;
using Xamarin.Forms.Xaml;
using XamSQLite.Models;
using XamSQLite.ViewModels;
namespace XamSQLite.Views
{
[XamlCompilation(XamlCompilationOptions.Compile)]
public partial class ProductPage : ContentPage
{
VMProducts vm;
public ProductPage()
{
InitializeComponent();
vm = new VMProducts();
this.BindingContext = vm;
}
protected override void OnAppearing()
{
if (vm != null)
vm.GetProducts();
base.OnAppearing();
}
private async void btnAddProduct_Clicked(object sender, EventArgs e)
{
await Navigation.PushAsync(new AddProduct(null));
}
private async void lstProduct_ItemSelected(object sender, SelectedItemChangedEventArgs e)
{
try
{
if (lstProduct.SelectedItem != null)
{
var product = (Products)lstProduct.SelectedItem;
lstProduct.SelectedItem = null;
await Navigation.PushAsync(new AddProduct(product));
}
}
catch (Exception ex)
{
}
}
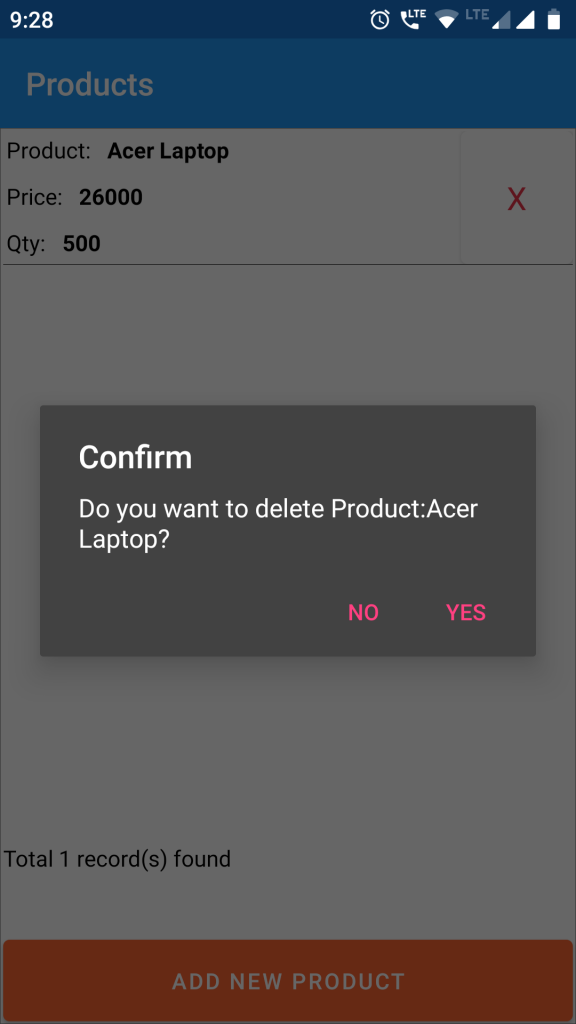
private async void btnDeleteProduct_Clicked(object sender, EventArgs e)
{
try
{
string ID = (sender as Button).CommandParameter.ToString();
if (!string.IsNullOrWhiteSpace(ID))
{
var product = vm.lstProducts.Where(x => x.ID.ToString() == ID);
var result = await DisplayAlert("Confirm", "Do you want to delete Product:" + product.FirstOrDefault().Name + "?", "Yes", "No");
if (result)
vm.DeleteProduct(product.FirstOrDefault());
}
}
catch (Exception ex)
{
}
}
}
}
Create another layout form with name AddProduct.xaml and edit it as below:
Views > AddProduct.xaml:
<?xml version="1.0" encoding="utf-8" ?>
<ContentPage xmlns="http://xamarin.com/schemas/2014/forms"
xmlns:x="http://schemas.microsoft.com/winfx/2009/xaml"
x:Class="XamSQLite.Views.AddProduct"
Title="Add Products"
Visual="Material"
BackgroundColor="White">
<ContentPage.Content>
<StackLayout Orientation="Vertical" HorizontalOptions="FillAndExpand" VerticalOptions="FillAndExpand"
Padding="10">

<Entry Text="{Binding product.ID}" Margin="0" FontSize="1" IsVisible="false"
HorizontalOptions="FillAndExpand"/>

<Label Text="Product Name:" Margin="2"/>
<Entry Text="{Binding product.Name}" Margin="2,2,2,5" HorizontalOptions="FillAndExpand"/>

<Label Text="Price" Margin="2"/>
<Entry Text="{Binding product.Price}" Margin="2,2,2,5"
HorizontalOptions="FillAndExpand" Keyboard="Numeric"/>

<Label Text="Quantity" Margin="2"/>
<Entry Text="{Binding product.Quantity}" Margin="2,2,2,5"
HorizontalOptions="FillAndExpand" Keyboard="Numeric"/>

<Label Text="{Binding lblInfo}" Margin="2,2,2,5"/>

<Grid HorizontalOptions="FillAndExpand">
<Grid.ColumnDefinitions>
<ColumnDefinition Width="1*"/>
<ColumnDefinition Width="1*"/>
</Grid.ColumnDefinitions>

<Button Text="{Binding btnSaveLabel}" x:Name="btnSave" HorizontalOptions="FillAndExpand"
BackgroundColor="#ff6633" TextColor="#fff"
Margin="2" Grid.Column="0" Grid.Row="0" Command="{Binding btnSaveProduct}"/>

<Button Text="CLEAR" x:Name="btnClear" HorizontalOptions="FillAndExpand"
BackgroundColor="#bfbfbf" TextColor="#fff"
Margin="2" Grid.Column="1" Grid.Row="0" Command="{Binding btnClearProduct}"/>
</Grid>

</StackLayout>
</ContentPage.Content>
</ContentPage>
This form is used for Adding and Updating SQLite database records.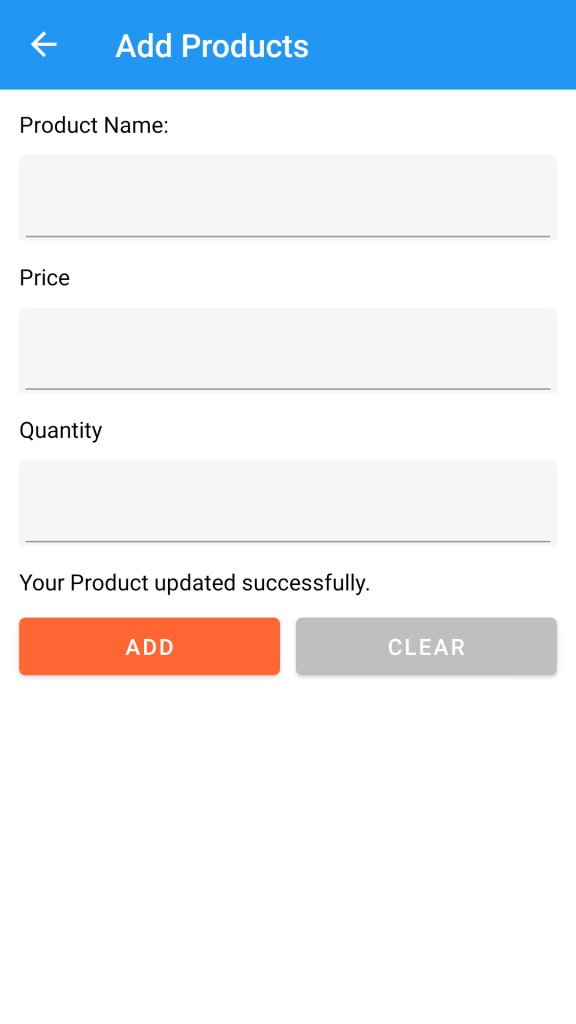
Edit its code-behind as below:
Views > AddProduct.xaml > AddProduct.xaml.cs:
using System;
using Xamarin.Forms;
using Xamarin.Forms.Xaml;
using XamSQLite.Models;
using XamSQLite.ViewModels;

namespace XamSQLite.Views
{
[XamlCompilation(XamlCompilationOptions.Compile)]
public partial class AddProduct : ContentPage
{
public AddProduct(Products product)
{
try
{
InitializeComponent();
VMAddProduct vm = new VMAddProduct(product);
this.BindingContext = vm;
}
catch(Exception ex)
{

}

}
}
}
Create a new folder with name ViewModels and create below classes inside of it.
ViewModels > VMAddProduct.cs:
using System;
using System.ComponentModel;
using System.Runtime.CompilerServices;
using Xamarin.Forms;
using XamSQLite.Database;
using XamSQLite.Models;

namespace XamSQLite.ViewModels
{
public class VMAddProduct : INotifyPropertyChanged
{
private Products _products { get; set; }

public Products product
{
get { return _products; }
set
{
_products = value;
OnPropertyChanged();
}
}

private string _lblInfo { get; set; }
public string lblInfo
{
get { return _lblInfo; }
set
{
_lblInfo = value;
OnPropertyChanged();
}
}

private string _btnSaveLabel { get; set; }
public string btnSaveLabel
{
get { return _btnSaveLabel; }
set
{
_btnSaveLabel = value;
OnPropertyChanged();
}
}

public Command btnSaveProduct { get; set; }
public Command btnClearProduct { get; set; }
public VMAddProduct(Products obj)
{
if (obj == null || obj.ID == 0)
ClearProduct();

else
{
product = obj;
btnSaveLabel = "UPDATE";
}
btnSaveProduct = new Command(SaveProduct);
btnClearProduct = new Command(ClearProduct);
}

public void SaveProduct()
{
try
{
ProductDatabase productDatabase = new ProductDatabase();
int i = productDatabase.saveProduct(product).Result;

if (i == 1)
{

if (btnSaveLabel.Equals("ADD"))
{
ClearProduct();
lblInfo = "Your Product saved successfully.";
}
else
{
ClearProduct();
lblInfo = "Your Product updated successfully.";
}
}
else
lblInfo = "Cannot save Product Information";
}

catch (Exception ex)
{
lblInfo = ex.Message.ToString();
}
}

public void ClearProduct()
{
product = new Products();
product.ID = 0;
product.Name = "";
product.Price = null;
product.Quantity = null;
lblInfo = "";
btnSaveLabel = "ADD";
}

public event PropertyChangedEventHandler PropertyChanged;

private void OnPropertyChanged([CallerMemberName] string propertyName = "")
{
if (PropertyChanged != null)
{
PropertyChanged(this, new PropertyChangedEventArgs(propertyName));
}
}
}
}
ViewModels > VMProducts.cs:
using System;
using System.Collections.ObjectModel;
using System.ComponentModel;
using System.Runtime.CompilerServices;
using Xamarin.Forms;
using XamSQLite.Database;
using XamSQLite.Models;

namespace XamSQLite.ViewModels
{
public class VMProducts : INotifyPropertyChanged
{
private ObservableCollection<Products> _lstProducts { get; set; }

public ObservableCollection<Products> lstProducts
{
get { return _lstProducts; }
set
{
_lstProducts = value;
OnPropertyChanged();
}
}

public Command btnAddProduct { get; set; }

private string _lblInfo { get; set; }
public string lblInfo
{
get { return _lblInfo; }
set
{
_lblInfo = value;
OnPropertyChanged();
}
}

public VMProducts()
{
lstProducts = new ObservableCollection<Products>();

}

public void GetProducts()
{
try
{
ProductDatabase productDatabase = new ProductDatabase();
var products = productDatabase.getProducts().Result;

if (products != null && products.Count > 0)
{
lstProducts = new ObservableCollection<Products>();

foreach (var prod in products)
{
lstProducts.Add(new Products
{
ID = prod.ID,
Name = prod.Name,
Price = prod.Price,
Quantity = prod.Quantity
});
}

lblInfo = "Total " + products.Count.ToString() + " record(s) found";
}
else
lblInfo = "No product records found. Please add one";
}

catch (Exception ex)
{
lblInfo = ex.Message.ToString();
}
}

public void DeleteProduct(Products product)
{
try
{
ProductDatabase productDatabase = new ProductDatabase();
var result = productDatabase.deleteProduct(product).Result;

if (result == 1)
GetProducts();
else
lblInfo = "Cannot Delete this Product.";
}

catch (Exception ex)
{
lblInfo = ex.Message.ToString();
}
}

public event PropertyChangedEventHandler PropertyChanged;

private void OnPropertyChanged([CallerMemberName] string propertyName = "")
{
if (PropertyChanged != null)
{
PropertyChanged(this, new PropertyChangedEventArgs(propertyName));
}
}
}
}
Now run the app. You will be able to add,update,read and delete records (CRUD operations) in your Xamarin Application into SQLite database. You can download the source code for free from link below. Please like our Facebook page for latest updates.