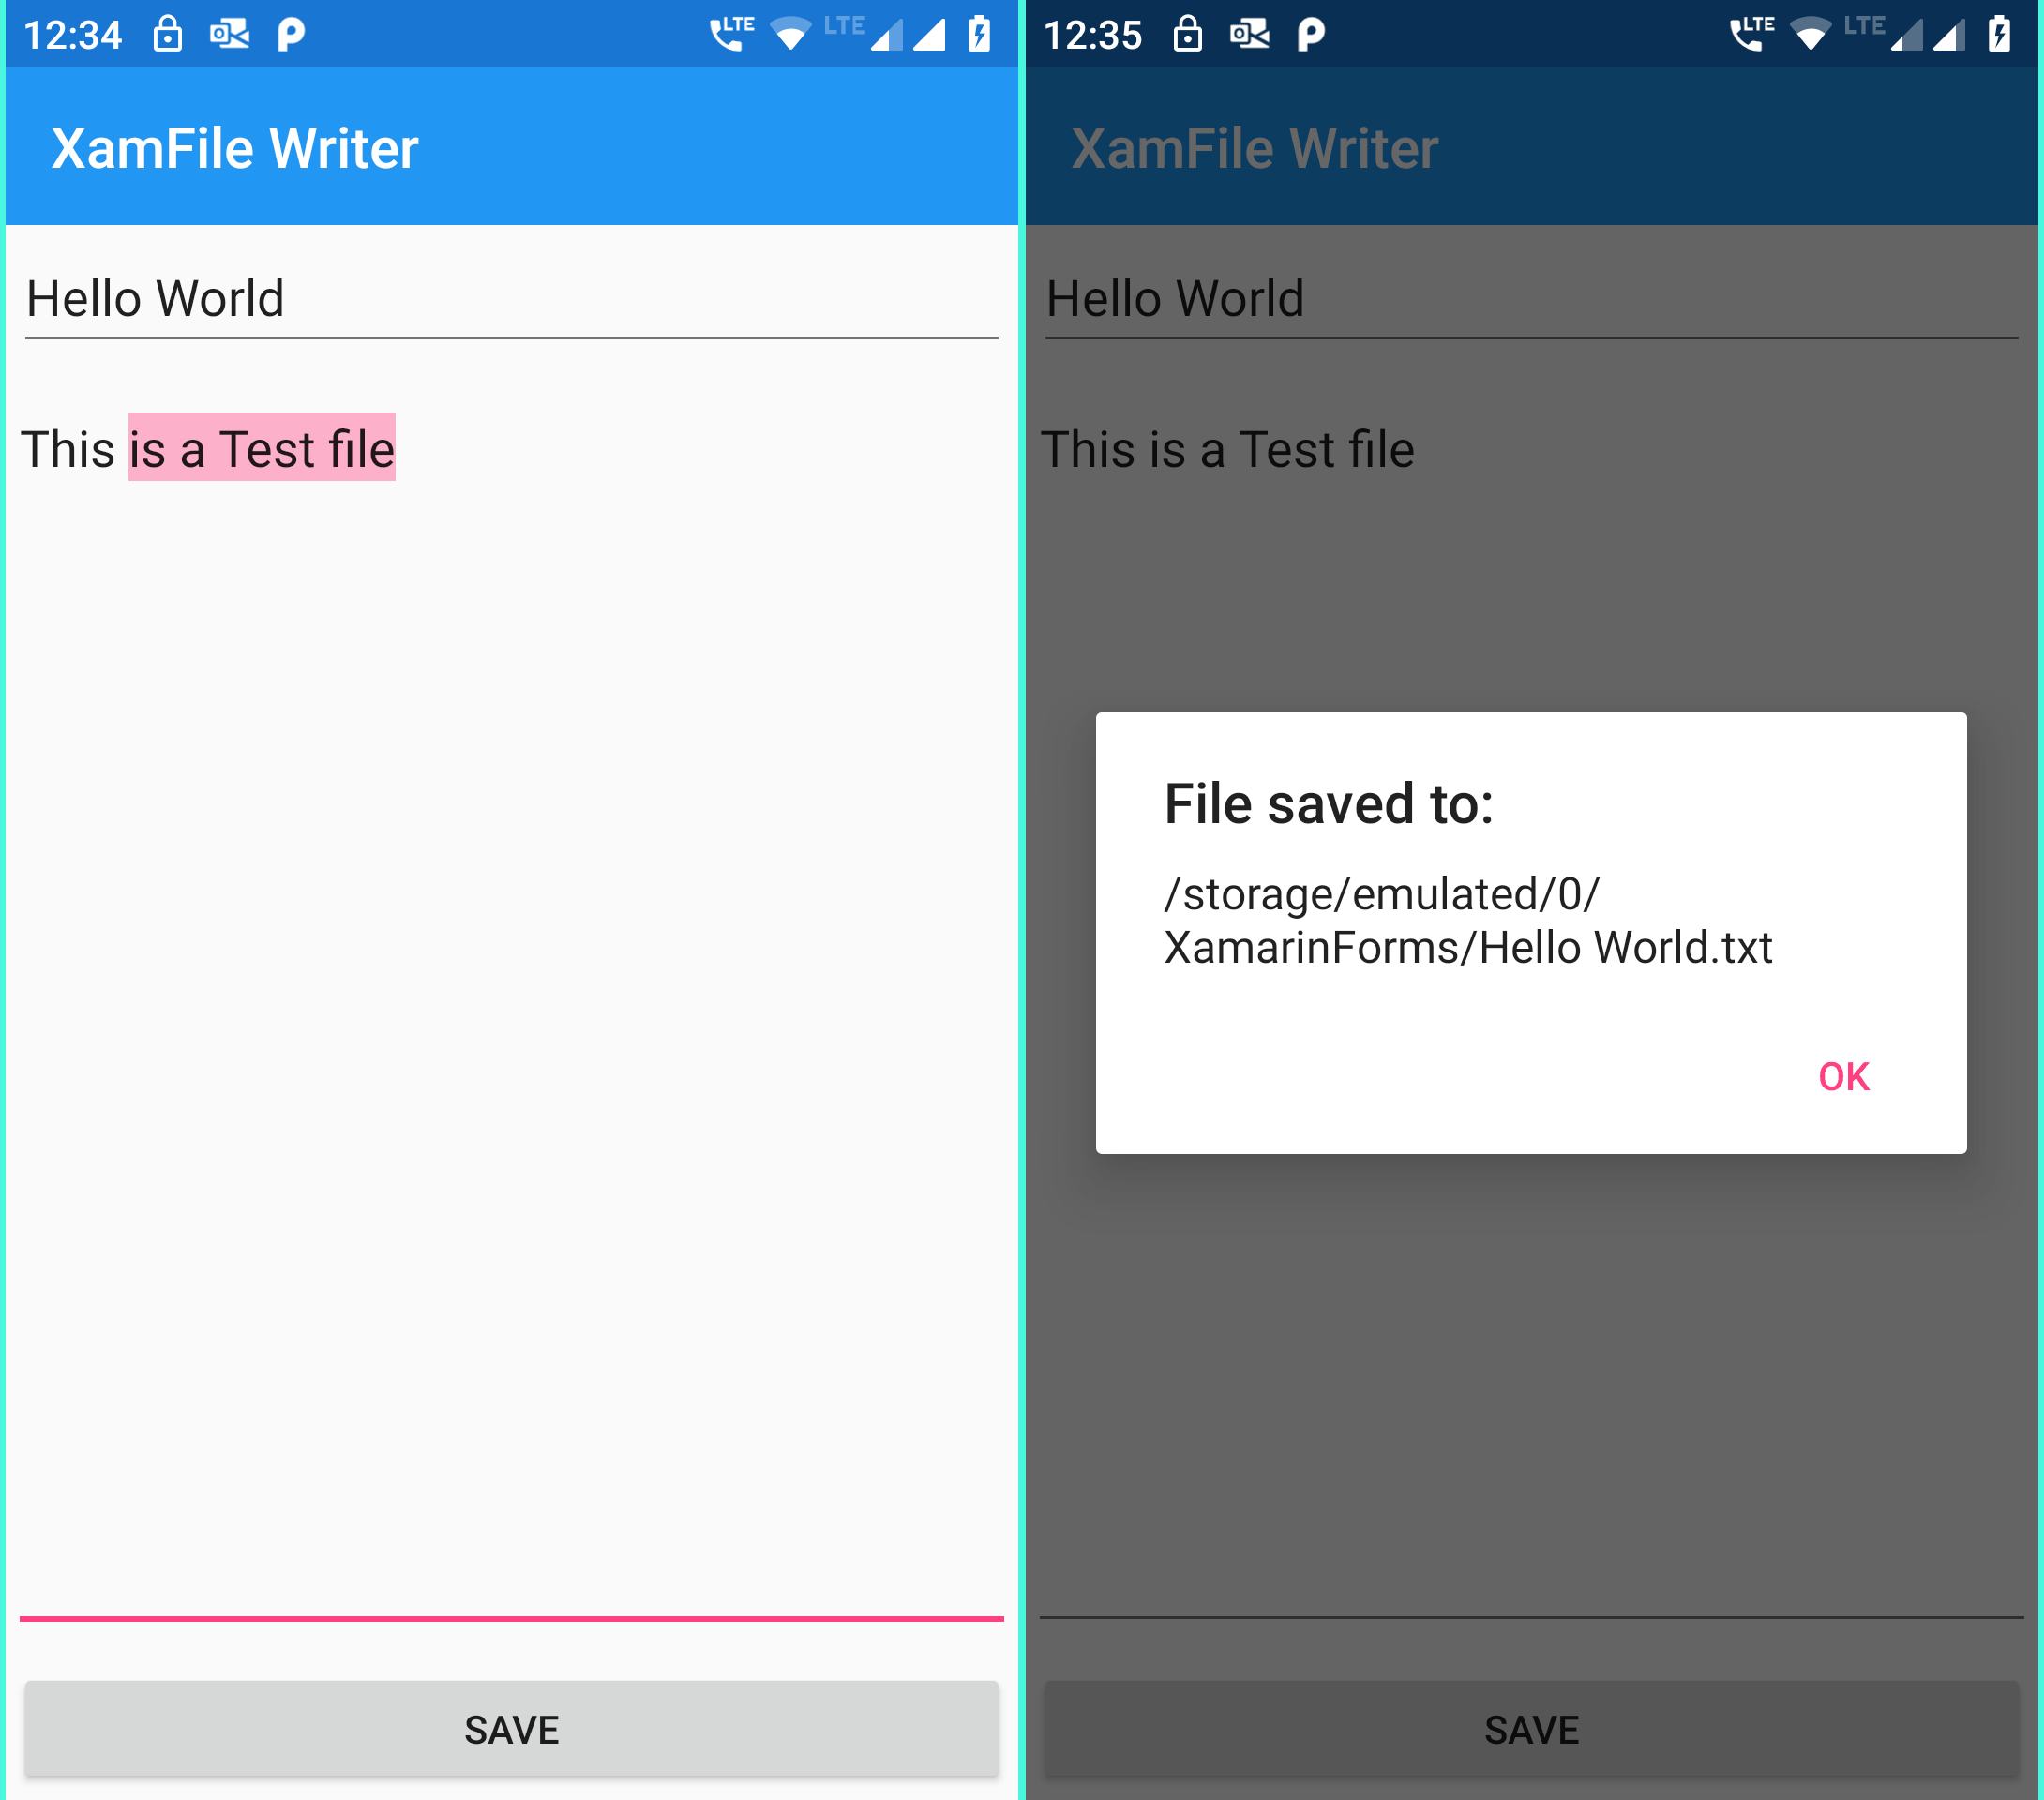
In previous post we saw How to use Camera and Save Images to Gallery in Xamarin Forms applications. In this post we will see How we can create a Text file, write some text on to it and save it in custom Folder on Android and inside special folders for iOS devices. For both the platforms we will display the final path of the text file being saved. So let’s create this application. We will create a simple application with Xamarin forms Entry and Editor controls to enter text file Name and its Contents and a button to save it.
First in your MainPage.xaml file create a Grid control layout and add Entry, Editor and button controls as below:
MainPage.xaml:
<?xml version="1.0" encoding="utf-8" ?>
<ContentPage xmlns="http://xamarin.com/schemas/2014/forms"
xmlns:x="http://schemas.microsoft.com/winfx/2009/xaml"
x:Class="XamFileWriter.MainPage">

<Grid HorizontalOptions="FillAndExpand" VerticalOptions="FillAndExpand" Padding="1">
<!-- Place new controls here -->

<Grid.RowDefinitions>
<RowDefinition Height="1*"/>
<RowDefinition Height="9*"/>
<RowDefinition Height="1*"/>
</Grid.RowDefinitions>

<Entry x:Name="txtFileName" Margin="2" HorizontalOptions="FillAndExpand"
Grid.Row="0" Placeholder="Enter File Name"/>

<Editor Placeholder="Enter Your Text" Grid.Row="1" HorizontalOptions="FillAndExpand"
x:Name="txtFileText" />

<Button Text="Save" Margin="2" HorizontalOptions="FillAndExpand" Grid.Row="2"
x:Name="btnSave" Clicked="BtnSave_Clicked"/>
</Grid>

</ContentPage>
These are for entering file name, its content and to save our Text file. 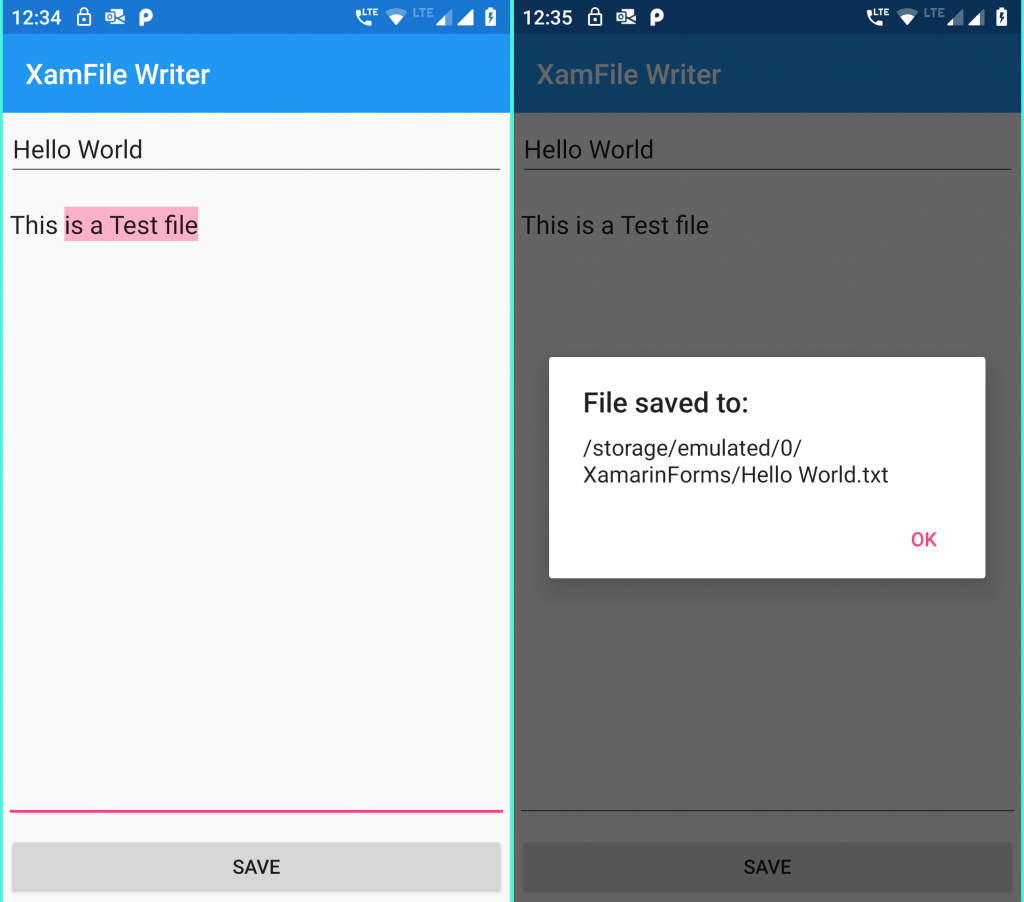
Now create a interface class in your project with name IFileWriter.cs and edit it as below:
IFileWriter.cs:
namespace XamFileWriter
{
public interface IFileWriter
{
string getPath();
}
}
This interface class file will be only used for Android device as we will be saving our Text file to a custom folder in Android devices. For iOS we will save it default Special folder.
Now Edit the MainPage.xaml.cs class file as below:
MainPage.xaml.cs:
using System;
using Xamarin.Forms;

namespace XamFileWriter
{
public partial class MainPage : ContentPage
{
public MainPage()
{
InitializeComponent();
NavigationPage.SetHasNavigationBar(this, true);
this.Title = "XamFile Writer";
}

private async void BtnSave_Clicked(object sender, EventArgs e)
{
try
{
if(string.IsNullOrWhiteSpace(Convert.ToString(txtFileName.Text)))
{
await DisplayAlert("Error", "Please enter File Name","Ok");
return;
}

else if (string.IsNullOrWhiteSpace(Convert.ToString(txtFileText.Text)))
{
await DisplayAlert("Error", "Please enter File Name", "Ok");
return;
}

string filePath = "";

if(Device.RuntimePlatform == Device.Android)
filePath = DependencyService.Get<IFileWriter>().getPath()+"/XamarinForms";

else
filePath = Environment.GetFolderPath(Environment.SpecialFolder.Personal);

var filename = System.IO.Path.Combine(filePath,txtFileName.Text.ToString()+".txt");
System.IO.File.WriteAllText(filename, txtFileText.Text.ToString());
await DisplayAlert("File saved to:", System.IO.Path.Combine(filePath, txtFileName.Text.ToString()).ToString()+".txt", "Ok");
}
catch(Exception ex)
{
await DisplayAlert("Error:", ex.Message.ToString(), "Ok");
}
}

}
}
For Android platform we will get the file path from interface and for iOS we will use Environment.GetFolderPath(Environment.SpecialFolder.Personal) folder to save our file. For writing the text content to our text file we are using System.IO.File File class. And we are also displaying the file path using Xamarin Alert Display dialog.
Now we will have to implement the interface for Android platform and also implement permissions.
Android SetUp:
In your Android project create a new class file FileWriter.cs and edit it as below:
Android Project > FileWriter.cs:
using XamFileWriter.Droid;
[assembly: Xamarin.Forms.Dependency(typeof(FileWriter))]
namespace XamFileWriter.Droid
{
public class FileWriter : IFileWriter
{
public string getPath()
{

return Android.OS.Environment.ExternalStorageDirectory.ToString();
}
}
}
Now in your Android Manifest file define the permissions used by our application like below:
AndroidManifest.xml:
<?xml version="1.0" encoding="utf-8"?>
<manifest xmlns:android="http://schemas.android.com/apk/res/android" android:versionCode="1"
android:versionName="1.0" package="com.companyname.XamFileWriter" android:installLocation="auto">
<uses-sdk android:minSdkVersion="21" android:targetSdkVersion="28" />
<uses-permission android:name="android.permission.READ_EXTERNAL_STORAGE" />
<uses-permission android:name="android.permission.WRITE_EXTERNAL_STORAGE" />
<application android:label="XamFile Writer"></application>
</manifest>
In MainActivity.cs class implement code to Request for External storage on onStart method:
MainActivity.cs:
using System;

using Android.App;
using Android.Content.PM;
using Android.Runtime;
using Android.Views;
using Android.Widget;
using Android.OS;
using Android;

namespace XamFileWriter.Droid
{
[Activity(Label = "XamFile Writer", Icon = "@mipmap/icon", Theme = "@style/MainTheme", MainLauncher = true, ConfigurationChanges = ConfigChanges.ScreenSize | ConfigChanges.Orientation)]
public class MainActivity : global::Xamarin.Forms.Platform.Android.FormsAppCompatActivity
{
const int RequestId = 0;

readonly string[] LocationPermissions =
{
Manifest.Permission.ReadExternalStorage,
Manifest.Permission.WriteExternalStorage
};

protected override void OnCreate(Bundle savedInstanceState)
{
TabLayoutResource = Resource.Layout.Tabbar;
ToolbarResource = Resource.Layout.Toolbar;

base.OnCreate(savedInstanceState);
global::Xamarin.Forms.Forms.Init(this, savedInstanceState);
LoadApplication(new App());
}

protected override void OnStart()
{
base.OnStart();

if ((int)Build.VERSION.SdkInt >= 23)
{
if (CheckSelfPermission(Manifest.Permission.AccessFineLocation) != Permission.Granted)
RequestPermissions(LocationPermissions, RequestId);


}
}

public override void OnRequestPermissionsResult(int requestCode, string[] permissions, [GeneratedEnum] Permission[] grantResults)
{
if (requestCode == RequestId)
{
if ((grantResults.Length == 1) && (grantResults[0] == (int)Permission.Granted))
{
///Premission granted by user
}
else
{
///Permission denied by user
}
}
else
{
base.OnRequestPermissionsResult(requestCode, permissions, grantResults);
}
}
}
}
All Set! We can now run our Xamarin Application.
Please like our Facebook Page and Subscribe to our channel on Youtube for latest updates.