Android Google Maps Tutorial
After playing around with google maps api for android here’s the post about so far how much I have learned about it.
This will surely help you to understand google maps api for developers.
SOFTWARE USED :
You can follow Google’s official post for adding Google play service in your SDK package as I did, its simple.
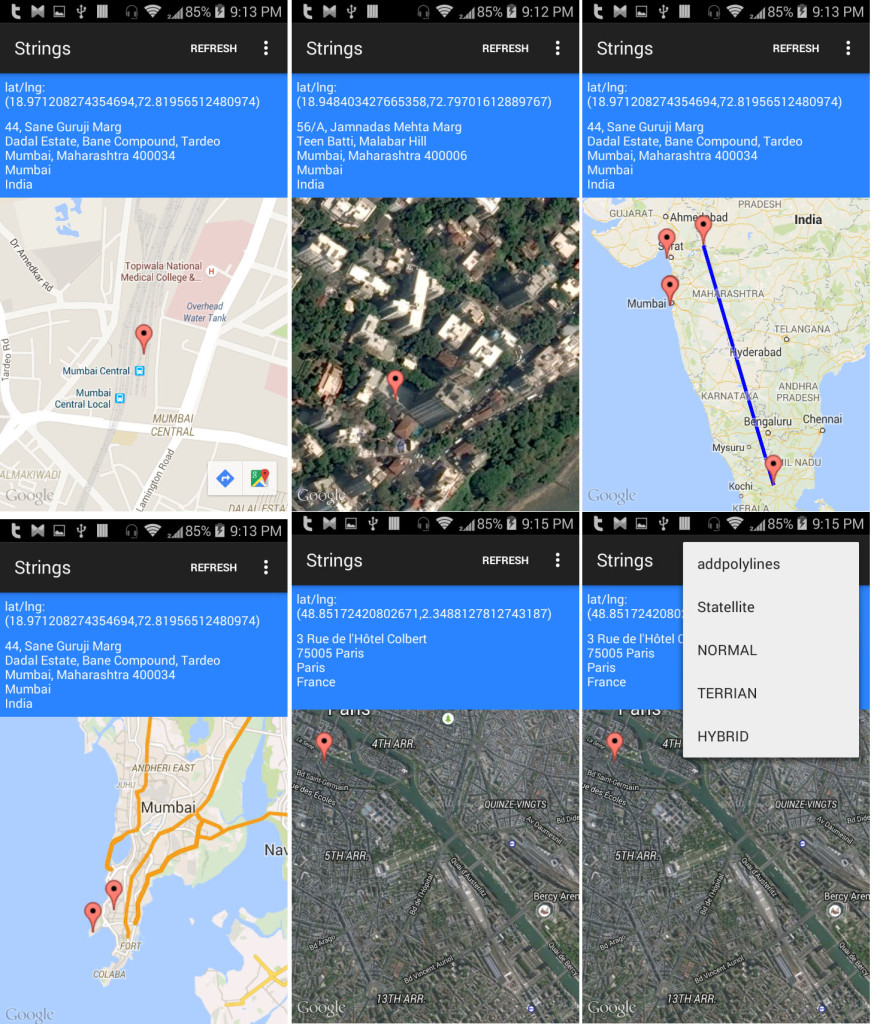
What the application will be doing:
- ADDING MARKERS POLYLINES BETWEEN TWO LATLNG
- SHOWING ADDRESS OF LOCATION OF LONG SELECTION WITH GEOCODER
- SHOWING DIFFERENT MAP TYPES (Statellite, Terrian, Hybrid)
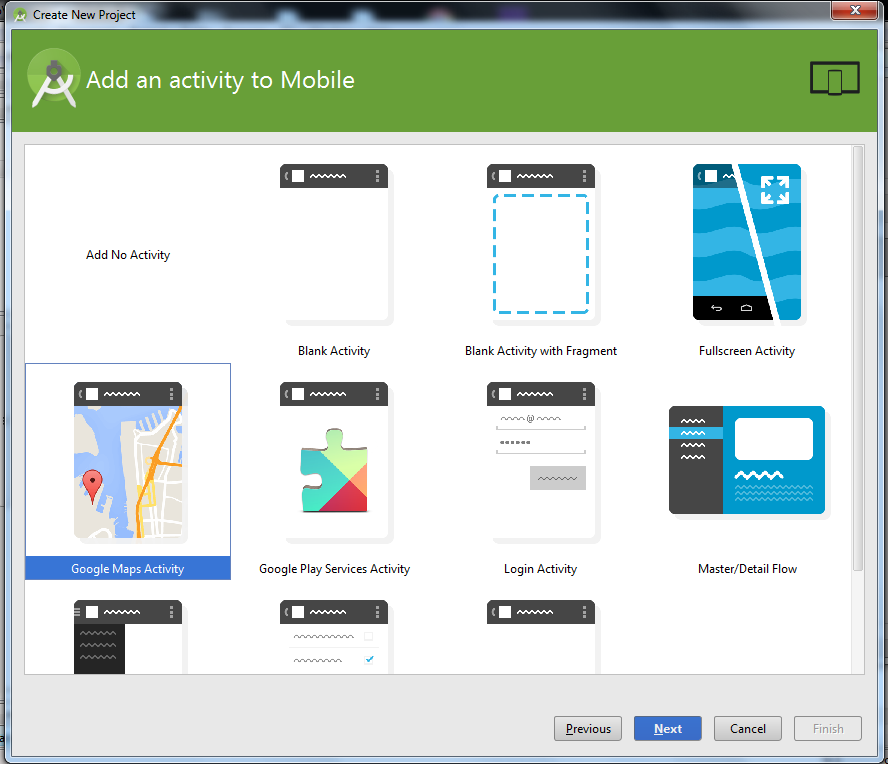
Make a new Android Studio Project (name it whatever you wish to name) and select your activity as
Google Map Activity
This will automatically make a file named google_maps_api at [ YourApplicationName > app > src > debug > res > values] .
This is important file as here you have to add Google Map API key
Google_maps_api.xml
<resources>
<!--
TODO: Before you run your application, you need a Google Maps API key.

To get one, follow this link, follow the directions and press "Create" at the end:

https://console.developers.google.com/flows/enableapi?apiid=maps_android_backend&keyType=CLIENT_SIDE_ANDROID&r=HERE YOUR SHA INFO OF YOUR CONSOLE

You can also add your credentials to an existing key, using this line:
Once you have your key (it starts with "AIza"), replace the "google_maps_key"
string in this file.
-->
<string name="google_maps_key" translatable="false" templateMergeStrategy="preserve">
YOUR GOOGLE MAP API KEY HERE
</string>
</resources>
1. DESIGN
Open your activity_main.xml and add a fragment in which google map will show up.
activity_main.xml
<LinearLayout xmlns:android="http://schemas.android.com/apk/res/android"
xmlns:tools="http://schemas.android.com/tools"
android:layout_width="match_parent"
android:background="#ff221043"
android:weightSum="5"
android:orientation="vertical"
android:layout_height="match_parent">

<LinearLayout
android:layout_width="match_parent"
android:layout_height="wrap_content"
android:layout_weight="1"
android:padding="5dp"
android:weightSum="3"
android:orientation="vertical"
android:background="#ff2b84ff">

<TextView
android:layout_width="match_parent"
android:layout_height="0dp"
android:layout_weight="1"
android:textColor="#fff"
android:id="@+id/txtlatlng"/>

<TextView
android:layout_width="match_parent"
android:layout_height="0dp"
android:layout_marginTop="2dp"
android:layout_weight="2"
android:textColor="#fff"
android:id="@+id/txtaddress"/>

</LinearLayout>

<fragment
android:layout_width="match_parent"
android:layout_height="0dp"
android:layout_weight="4"
android:id="@+id/map"
tools:context="hitesh.myapplication.map.MapsActivity"
android:name="com.google.android.gms.maps.SupportMapFragment" />

</LinearLayout>
Make a new folder ( if its not present ) named menu [res > menu ]
Make a new menu xml file in your [ res > menu] folder named map_menu.xml and edit it as following :
Map_menu.xml
<menu xmlns:android="http://schemas.android.com/apk/res/android"
xmlns:app="http://schemas.android.com/apk/res-auto"
xmlns:tools="http://schemas.android.com/tools"
tools:context="rajkamal.maps.main.MainActivity" >

<item
android:id="@+id/menurefresh"
android:orderInCategory="100"
android:title="REFRESH"
app:showAsAction="always|withText"/>
<item
android:id="@+id/addpolylines"
android:orderInCategory="100"
android:title="ADD POLYLINES"
app:showAsAction="never"/>

<item
android:id="@+id/menustatellite"
android:orderInCategory="100"
android:title="Statellite"
app:showAsAction="never"/>
<item
android:id="@+id/menunormal"
android:orderInCategory="100"
android:title="NORMAL"
app:showAsAction="never"/>
<item
android:id="@+id/menuterrian"
android:orderInCategory="100"
android:title="TERRIAN"
app:showAsAction="never"/>

<item
android:id="@+id/menuhybrid"
android:orderInCategory="100"
android:title="HYBRID"
app:showAsAction="never"/>

</menu>
Here I’m just adding options to change the view of our map.
2. CODE
Open your MapsActivity.java class file and edit it as below :
package hitesh.mapapplication;

import android.graphics.Color;
import android.location.Address;
import android.location.Geocoder;
import android.os.Bundle;
import android.support.v7.app.ActionBarActivity;
import android.view.Menu;
import android.view.MenuItem;
import android.widget.TextView;

import com.google.android.gms.maps.CameraUpdate;
import com.google.android.gms.maps.CameraUpdateFactory;
import com.google.android.gms.maps.GoogleMap;
import com.google.android.gms.maps.SupportMapFragment;
import com.google.android.gms.maps.model.BitmapDescriptorFactory;
import com.google.android.gms.maps.model.LatLng;
import com.google.android.gms.maps.model.MarkerOptions;
import com.google.android.gms.maps.model.PolylineOptions;

import java.util.List;
import java.util.Locale;

public class MapsActivity extends ActionBarActivity {

private GoogleMap mMap; // for map
LatLng l1,l2; // latitude for drawing polylines

TextView txtlatlng, txtaddress;

@Override
protected void onCreate(Bundle savedInstanceState) {
super.onCreate(savedInstanceState);
setContentView(R.layout.activity_maps);
l1 = new LatLng(21.711971, 74.427040); // latitude one
l2 = new LatLng(10.465408, 77.865775); // latitude two

txtlatlng = (TextView) findViewById(R.id.txtlatlng);
txtaddress = (TextView) findViewById(R.id.txtaddress);

setUpMapIfNeeded();
mMap.setOnMapLongClickListener(new GoogleMap.OnMapLongClickListener() {
@Override
public void onMapLongClick(LatLng latLng) {
Markers(latLng);
}
});

}

@Override
protected void onResume() {
super.onResume();
setUpMapIfNeeded();
}

private void setUpMapIfNeeded() {

if (mMap == null) {
mMap = ((SupportMapFragment) getSupportFragmentManager().findFragmentById(R.id.map))
.getMap();
if (mMap != null) {
setUpMap();
}
}
}
private void setUpMap() {
mMap.addMarker(new MarkerOptions().position(new LatLng(0, 0)).title("Marker"));
}
@Override
public boolean onCreateOptionsMenu(Menu menu) {
// Inflate the menu; this adds items to the action bar if it is present.
getMenuInflater().inflate(R.menu.map_menu, menu);
return true;
}

@Override
public boolean onOptionsItemSelected(MenuItem item) {
// Handle action bar item clicks here. The action bar will
// automatically handle clicks on the Home/Up button, so long
// as you specify a parent activity in AndroidManifest.xml.
int id = item.getItemId();
switch (item.getItemId()) {

case R.id.menunormal:
mMap.setMapType(GoogleMap.MAP_TYPE_NORMAL);
break;

case R.id.menustatellite:
mMap.setMapType(GoogleMap.MAP_TYPE_SATELLITE);
break;

case R.id.menuterrian:
mMap.setMapType(GoogleMap.MAP_TYPE_TERRAIN);
break;

case R.id.menurefresh:
mMap.clear();
break;
case R.id.menuhybrid:
mMap.setMapType(GoogleMap.MAP_TYPE_HYBRID);
break;
case R.id.addpolylines:
addPolyLines();
break;

}
return super.onOptionsItemSelected(item);
}

public void addPolyLines()
{
mMap.addMarker(new MarkerOptions().icon(BitmapDescriptorFactory.fromResource(R.drawable.marker)).snippet("Location 1").position(l1));
mMap.addMarker(new MarkerOptions().icon(BitmapDescriptorFactory.fromResource(R.drawable.marker)).snippet("Location 2").position(l2));
mMap.addPolyline(new PolylineOptions().add(l1).add(l2).color(Color.BLUE).width(7));
CameraUpdate center = CameraUpdateFactory.newLatLng(l1);
CameraUpdate zoom = CameraUpdateFactory.zoomTo(5);

mMap.moveCamera(center);
mMap.animateCamera(zoom);
}

public void Markers(LatLng point) {
String m1 = String.valueOf(point); // LATITUDE LONGITUDE
txtlatlng.setText(m1);
String t = m1.replaceAll("[lat/lng:()]", "");
String[] sep = t.split(",");
String first = sep[0].toString();
String second = sep[1].toString();

double d1 = Double.parseDouble(first);
double d2 = Double.parseDouble(second);

mMap.animateCamera(CameraUpdateFactory.newLatLng(point));

Geocoder geoCoder = new Geocoder(this, Locale.getDefault());

try {
List<Address> addressList = geoCoder.getFromLocation(d1, d2, 1);

if (addressList != null && addressList.size() > 0) {
Address address = addressList.get(0);
StringBuilder sb = new StringBuilder();

for (int i = 0; i < address.getMaxAddressLineIndex(); i++) {
sb.append(address.getAddressLine(i)).append("\n");
}
sb.append(address.getLocality()).append("\n");
sb.append(address.getCountryName()).append("\n");
String m = sb.toString();
txtaddress.setText(m);

mMap.addMarker(new MarkerOptions().position(point).icon(BitmapDescriptorFactory
.fromResource(R.drawable.marker)).snippet("Marker1"));

CameraUpdate center = CameraUpdateFactory.newLatLng(point);
CameraUpdate zoom = CameraUpdateFactory.zoomTo(19);

mMap.moveCamera(center);
mMap.animateCamera(zoom);
}

} catch (Exception ex) {
lbladdress.setText(ex.getMessage().toString());

}
}
}
How to change your map type :
yourmapobjectname.setMapType(GoogleMap.MAP_TYPE_NORMAL);
yourmapobjectname.setMapType(GoogleMap.MAP_TYPE_SATELLITE);
yourmapobjectname.setMapType(GoogleMap.MAP_TYPE_TERRAIN);
yourmapobjectname.setMapType(GoogleMap.MAP_TYPE_HYBRID);
How to add a marker on your map :
yourmapobjectname.addMarker(new MarkerOptions().icon(BitmapDescriptorFactory.fromResource(R.drawable.marker)).snippet("THE NAME YOU WISH TO CALL").position(YOUR LATLNG));
How to add Polylines on your map :
yourmapobjectname.addPolyline(new PolylineOptions().add(START LATLNG).add(END LATLNG).color(Color.YourColor).width(1 to 15));
How to use GeoCoder to fetch address :
Basically geocoder can be used for geocoding and reverse geocoding.
This class is used for transforming the latitude and longitude of the particular address on our planet to a human readable address and human readable address to a (longitude and latitude) points.The Geocoder class requires a backend service that is not included in the core android framework. The Geocoder query methods will return an empty list if there no backend service in the platform.
List
addressList = geoCoder.getFromLocation(d1, d2, 1);
This returns a array of address that are known to descride the area immediately surrounding the given latitude and longitude and the 1 out there is the number of address we need. I need only one (you can fetch as many as you want).
For more on Geocoder class you can see google’s official post here GeoCoder.


Pingback: Android JSON Parsing • ParallelCodes
Pingback: Android Game Tutorial • ParallelCodes
Pingback: Connect Android to MS SQL Database. • ParallelCodes
Pingback: Android Import excel into Sqlite Database