Hi friends,
In this post we will create Navigation drawer in Android. Using Android studio project creation, you can create the navigation drawer project using default pages in Android. In this tutorial we will create it with different Android fragments and with icons for our options.
Navigation drawer can be used in Android to create easy and continuous navigation options in our applications. So let’s create it.
DOWNLOAD SOURCE CODE.
Implement Android support design 28.0.0 in your app’s build.gradle:
build.gradle(Module: app)
implementation fileTree(dir: 'libs', include: ['*.jar'])
implementation 'com.android.support:appcompat-v7:28.0.0'
implementation 'com.android.support:design:28.0.0'
implementation 'com.android.support.constraint:constraint-layout:1.1.3'
testImplementation 'junit:junit:4.12'
androidTestImplementation 'com.android.support.test:runner:1.0.2'
androidTestImplementation 'com.android.support.test.espresso:espresso-core:3.0.2'
Now edit your application AppTheme as below:
res>values>styles.xml:
<style name="AppTheme" parent="Theme.AppCompat.Light.NoActionBar">
<!-- Customize your theme here. -->
<item name="colorPrimary">@color/colorPrimary</item>
<item name="colorPrimaryDark">@color/colorPrimaryDark</item>
<item name="colorAccent">@color/colorAccent</item>
<item name="android:textColor">#000</item>
<item name="android:textSize">16sp</item>
</style>
Now change your android’s color scheme as below:
res>values>colors.xml:
<?xml version="1.0" encoding="utf-8"?>
<resources>
<color name="colorPrimary">#E91E63</color>
<color name="colorPrimaryDark">#880E4F</color>
<color name="colorAccent">#D81B60</color>
</resources>
Now add following
res>values>strings.xml:
<resources>
<string name="app_name">Android Navigation Drawer</string>

<string name="user_name">Hitesh Vikani</string>

<string name="open_drawer">Open drawer</string>
<string name="close_drawer">Close drawer</string>

<string name="lblHeader_Booking">Bookings</string>
<string name="lblHeader_Reviews">Reviews</string>

<string name="lblHeader_Services">Services</string>
<string name="lblHeader_ContactUs">Contact Us</string>
<string name="lblHeader_AboutUs">About Us</string>

</resources>
Create a menu folder in your res folder and add following file in your menu folder:
res>menu>menu_nav.xml:
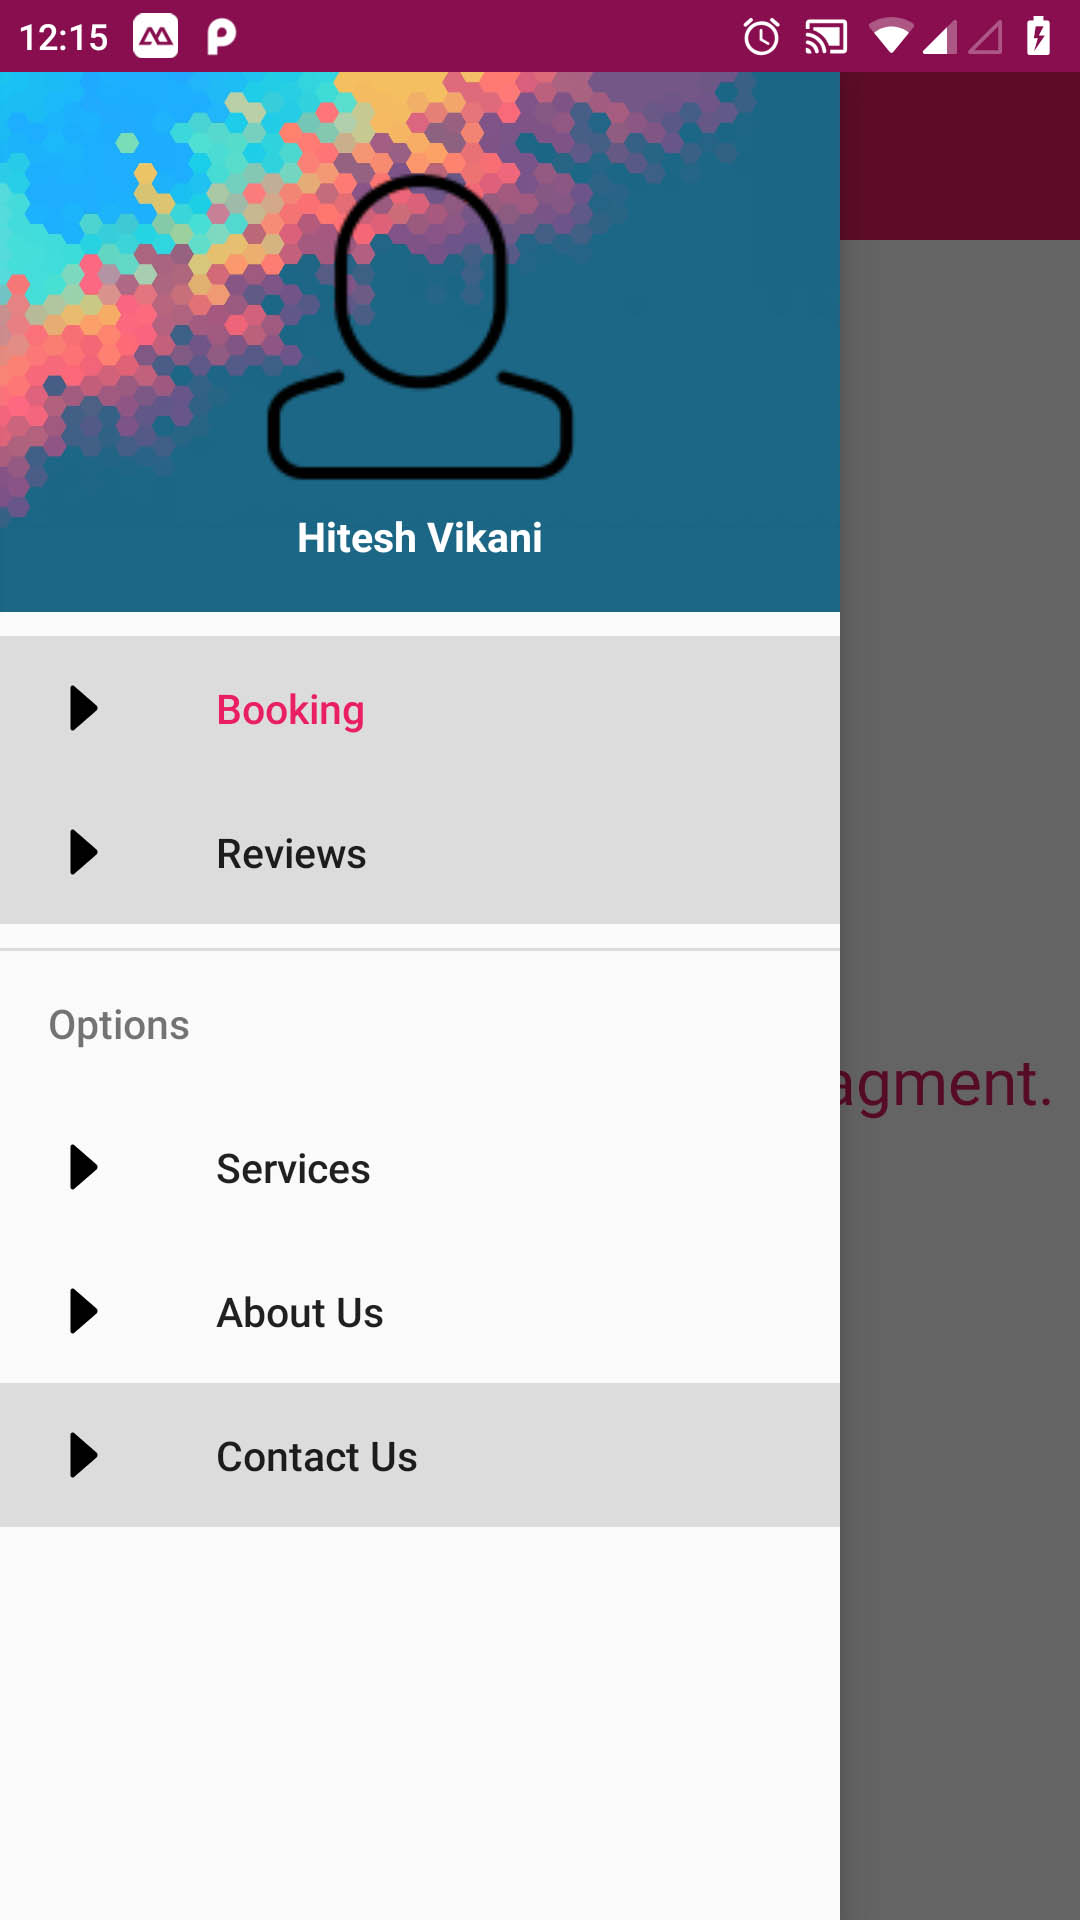
<?xml version="1.0" encoding="utf-8"?>
<menu xmlns:android="http://schemas.android.com/apk/res/android">

<group android:checkableBehavior="single">

<item
android:id="@+id/nav_booking"
android:checked="true"
android:icon="@drawable/right_icon"
android:title="Booking" />
<item
android:id="@+id/nav_Reviews"
android:checked="false"
android:icon="@drawable/right_icon"
android:title="Reviews" />

</group>

<item android:title="Options">
<menu>
<item
android:id="@+id/nav_services"
android:checked="false"
android:icon="@drawable/right_icon"
android:title="Services" />

<item
android:id="@+id/nav_aboutus"
android:checked="false"
android:icon="@drawable/right_icon"
android:title="About Us" />

<item
android:id="@+id/nav_contactus"
android:checked="false"
android:icon="@drawable/right_icon"
android:title="Contact Us" />
</menu>
</item>

</menu>
Now, we will create the layout files for our Android Navigation drawer:
Create following files in your res>layout folder:
res>layout>activity_main.xml:
<?xml version="1.0" encoding="utf-8"?>
<android.support.constraint.ConstraintLayout xmlns:android="http://schemas.android.com/apk/res/android"
xmlns:app="http://schemas.android.com/apk/res-auto"
xmlns:tools="http://schemas.android.com/tools"
android:layout_width="match_parent"
android:layout_height="match_parent"
tools:context=".MainActivity">

<TextView
android:id="@+id/txtLabel"
android:layout_width="wrap_content"
android:layout_height="wrap_content"
android:text="Hello World!"
android:textSize="25sp"
android:padding="5dp"
android:textColor="@color/colorAccent"
app:layout_constraintBottom_toBottomOf="parent"
app:layout_constraintLeft_toLeftOf="parent"
app:layout_constraintRight_toRightOf="parent"
app:layout_constraintTop_toTopOf="parent" />

</android.support.constraint.ConstraintLayout>
res>layout>nav_header.xml:
<?xml version="1.0" encoding="utf-8"?>
<FrameLayout xmlns:android="http://schemas.android.com/apk/res/android"
    android:layout_width="match_parent"
    android:layout_height="180dp"
    android:background="@drawable/headerbg"
    android:theme="@style/ThemeOverlay.AppCompat.Dark">

    <ImageView
        android:layout_width="130dp"
        android:layout_height="130dp"
        android:layout_gravity="center_horizontal"
        android:layout_marginTop="20dp"
        android:src="@drawable/profile" />

    <LinearLayout
        android:layout_width="match_parent"
        android:layout_height="match_parent"
        android:layout_margin="16dp"
        android:gravity="bottom|start"
        android:orientation="vertical">

        <TextView
            android:id="@+id/txtNameHeader"
            android:layout_width="wrap_content"
            android:layout_height="wrap_content"
            android:layout_gravity="center_horizontal"
            android:text="Hitesh Vikani"
            android:textColor="#fff"
            android:textStyle="bold" />
    </LinearLayout>

</FrameLayout>
res>layout>parent_layout.xml:
<?xml version="1.0" encoding="utf-8"?>
<android.support.v4.widget.DrawerLayout xmlns:android="http://schemas.android.com/apk/res/android"
    xmlns:app="http://schemas.android.com/apk/res-auto"
    android:id="@+id/drawer_layout"
    android:layout_width="match_parent"
    android:layout_height="match_parent">

    <LinearLayout
        android:layout_width="match_parent"
        android:layout_height="match_parent"
        android:orientation="vertical">

        <include
            android:id="@+id/toolbar"
            layout="@layout/toolbar_main" />

        <FrameLayout
            android:id="@+id/content_frame"
            android:layout_width="match_parent"
            android:layout_height="match_parent"></FrameLayout>
    </LinearLayout>

    <android.support.design.widget.NavigationView
        android:id="@+id/nav_view"

        android:layout_width="wrap_content"
        android:layout_height="match_parent"
        android:layout_gravity="start"
        app:headerLayout="@layout/nav_header"
        app:menu="@menu/menu_nav">

    </android.support.design.widget.NavigationView>

</android.support.v4.widget.DrawerLayout>
res>layout>toolbar_main.xml:
<?xml version="1.0" encoding="utf-8"?>
<android.support.v7.widget.Toolbar xmlns:android="http://schemas.android.com/apk/res/android"
    android:layout_width="match_parent"
    android:layout_height="?attr/colorPrimary"
    android:background="@color/colorPrimary"
    android:theme="@style/ThemeOverlay.AppCompat.Dark.ActionBar">

</android.support.v7.widget.Toolbar>
Add following images in your drawable folder:

![]()

This images will be used as the Android navigation drawer header background, profile image of user and icons of our Navigation drawer icons.
Edit your MainActivity.java as following:
MainActivity.java:
package com.parallel.androidnavigationdrawer;
import android.content.Intent;
import android.os.Bundle;
import android.support.design.widget.NavigationView;
import android.support.v4.app.Fragment;
import android.support.v4.app.FragmentTransaction;
import android.support.v4.view.GravityCompat;
import android.support.v4.widget.DrawerLayout;
import android.support.v7.app.ActionBarDrawerToggle;
import android.support.v7.app.AppCompatActivity;
import android.support.v7.widget.Toolbar;
import android.view.MenuItem;
import android.view.View;
import android.widget.TextView;
public class MainActivity extends AppCompatActivity
implements NavigationView.OnNavigationItemSelectedListener {
TextView txtNameHeader;
@Override
protected void onCreate(Bundle savedInstanceState) {
super.onCreate(savedInstanceState);
setContentView(R.layout.parent_layout);
Toolbar toolbar = findViewById(R.id.toolbar);
setSupportActionBar(toolbar);
toolbar.setTitle("Navigation Sample");
DrawerLayout drawer = (DrawerLayout) findViewById(R.id.drawer_layout);
ActionBarDrawerToggle toggle = new ActionBarDrawerToggle(this, drawer, toolbar,
R.string.open_drawer, R.string.close_drawer);
drawer.addDrawerListener(toggle);
toggle.syncState();
NavigationView navigationView = (NavigationView) findViewById(R.id.nav_view);
navigationView.setNavigationItemSelectedListener(this);
navigationView.setItemIconTintList(null);
try {
View headerView = navigationView.getHeaderView(0);
txtNameHeader = headerView.findViewById(R.id.txtNameHeader);
} catch (Exception ex) {
}
Fragment fragment = new Booking();
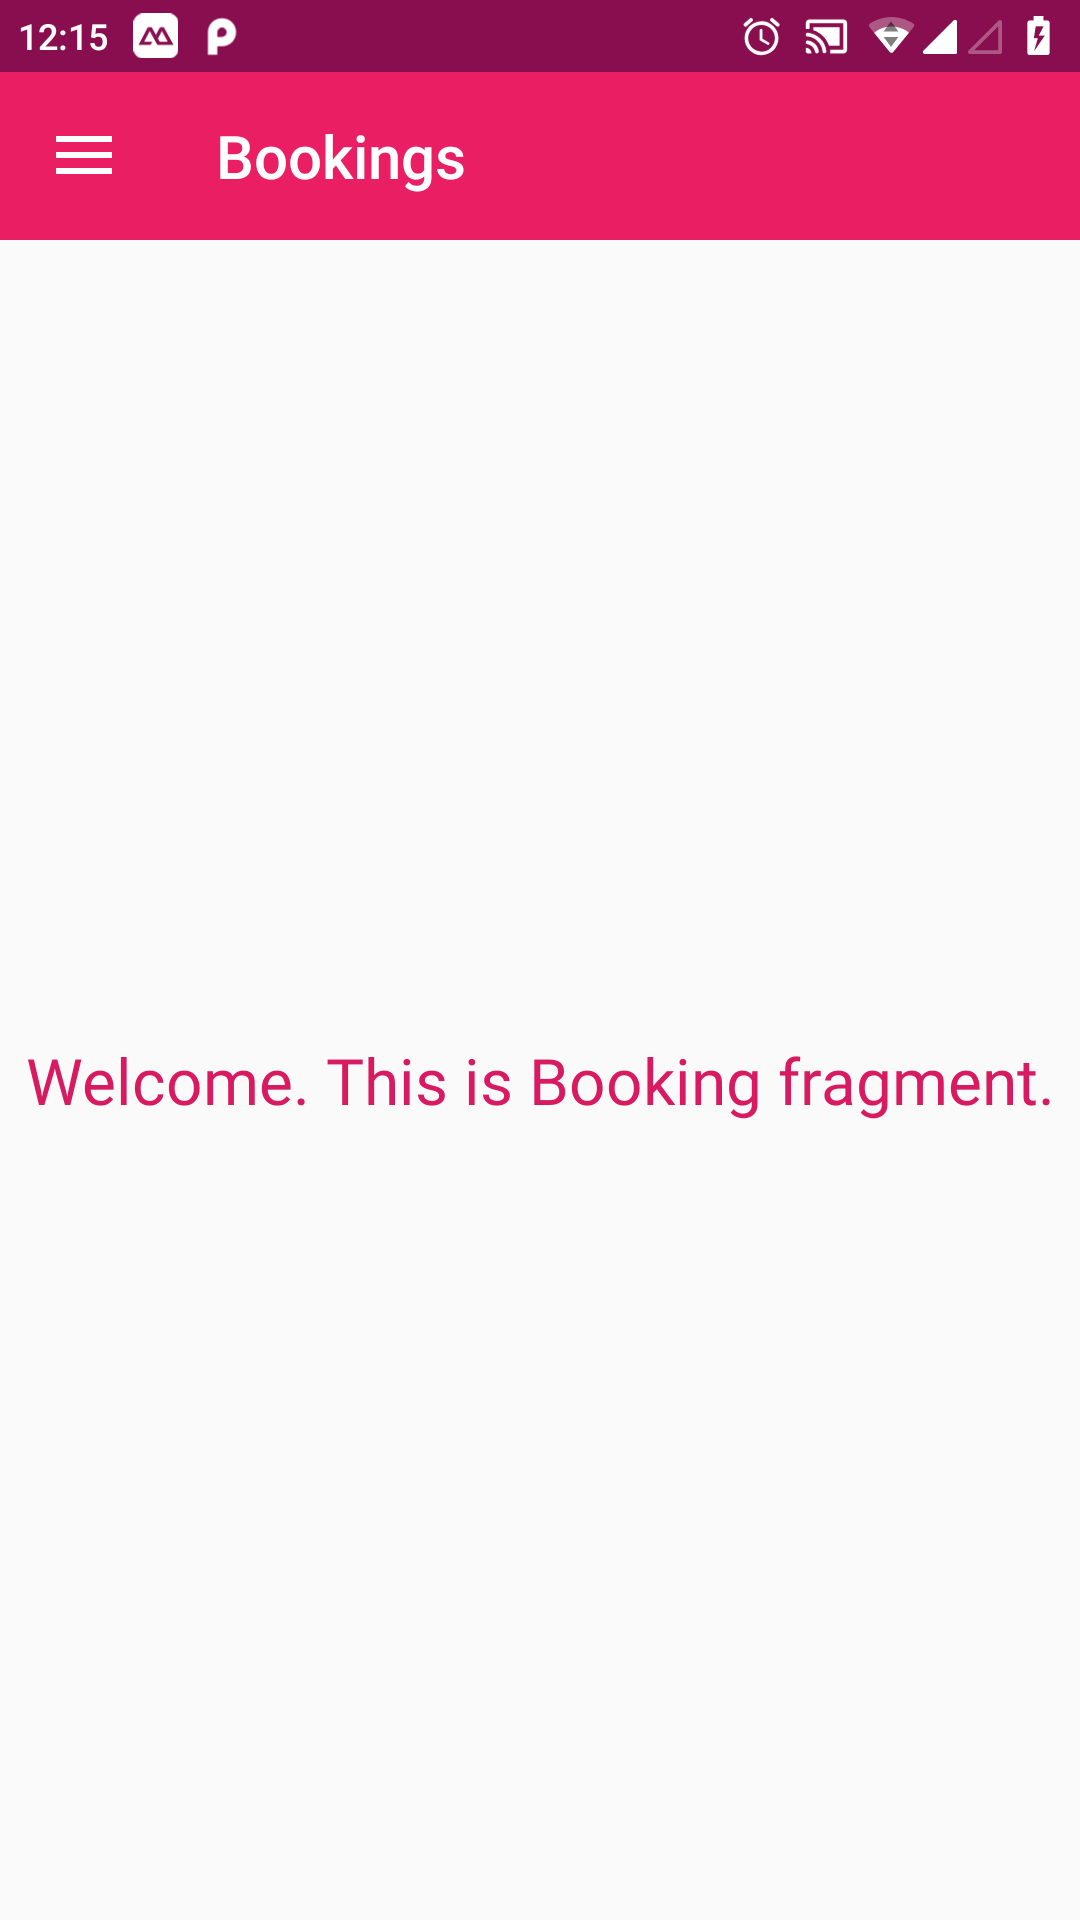
toolbar.setTitle(R.string.lblHeader_Booking);
FragmentTransaction ft = getSupportFragmentManager().beginTransaction();
ft.add(R.id.content_frame, fragment);
ft.commit();
}
@Override
public boolean onNavigationItemSelected(MenuItem item) {
int id = item.getItemId();
Fragment fragment = null;
Intent intent = null;
switch (id) {
case R.id.nav_booking:
fragment = new Booking();
break;
case R.id.nav_Reviews:
fragment = new Reviews();
break;
case R.id.nav_contactus:
fragment = new ContactUs();
break;
case R.id.nav_aboutus:
fragment = new AboutUs();
break;
case R.id.nav_services:
fragment = new Services();
break;
default:
fragment = new Booking();
}
if (fragment != null) {
FragmentTransaction ft = getSupportFragmentManager().beginTransaction();
ft.replace(R.id.content_frame, fragment);
ft.commit();
} else {
startActivity(intent);
}
DrawerLayout drawer = (DrawerLayout) findViewById(R.id.drawer_layout);
drawer.closeDrawer(GravityCompat.START);
return true;
}
@Override
public void onBackPressed() {
DrawerLayout drawer = (DrawerLayout) findViewById(R.id.drawer_layout);
if (drawer.isDrawerOpen(GravityCompat.START)) {
drawer.closeDrawer(GravityCompat.START);
} else {
super.onBackPressed();
}
}
}
Now add following class in your package name :
- AboutUs.java
- Booking.java
- ContactUs.java
- Reviews.java
- Services.java
Booking.java:
package com.parallel.androidnavigationdrawer;

import android.os.Bundle;
import android.support.annotation.Nullable;
import android.support.v4.app.Fragment;
import android.view.LayoutInflater;
import android.view.View;
import android.view.ViewGroup;
import android.widget.TextView;


public class Booking extends Fragment {


    @Override
    public View onCreateView(LayoutInflater inflater, ViewGroup container,
                             Bundle savedInstanceState) {
        getActivity().setTitle(R.string.lblHeader_Booking);
        return inflater.inflate(R.layout.activity_main, container, false);
    }

    @Override
    public void onViewCreated(View view, @Nullable Bundle savedInstanceState) {

        if (view != null) {
            TextView txtLabel = getView().findViewById(R.id.txtLabel);
            txtLabel.setText("Welcome. This is Booking fragment.");

        }
    }

}
Now you can edit all other classes as Booking.java class, the layout file will be same.
Example:
AboutUs.java:
package com.parallel.androidnavigationdrawer;

import android.os.Bundle;
import android.support.annotation.Nullable;
import android.support.v4.app.Fragment;
import android.view.LayoutInflater;
import android.view.View;
import android.view.ViewGroup;
import android.widget.TextView;


public class AboutUs extends Fragment {


    @Override
    public View onCreateView(LayoutInflater inflater, ViewGroup container,
                             Bundle savedInstanceState) {
        getActivity().setTitle(R.string.lblHeader_AboutUs);
        return inflater.inflate(R.layout.activity_main, container, false);
    }

    @Override
    public void onViewCreated(View view, @Nullable Bundle savedInstanceState) {

        if (view != null) {
            TextView txtLabel = getView().findViewById(R.id.txtLabel);
            txtLabel.setText("Welcome. This is About us fragment.");

        }
    }

}
Now run the application to see it in action.
See Also:
Pingback: Download source code no 25 - ParallelCodes