In this post let’s see How we can use Google Account to Login or fetch user details in our Android Application. The application will be also fetching the Profile Picture of the user and displaying it on Android Imageview. This particular example contains only one activity. So it is just a simple android login details app. Once the Login process is successful, application will fetch details like Username, Email Address, Id and Profile Picture URL. Once the user has logged-in, application will fetch the details when the application starts (One-Time actvitity), it will logout only when users clicks on Logout button and Logouts. Let’s just start without former Introduction.
Android Login with Google Account:
Please follow the steps below to make your Android Login with Google Account project –
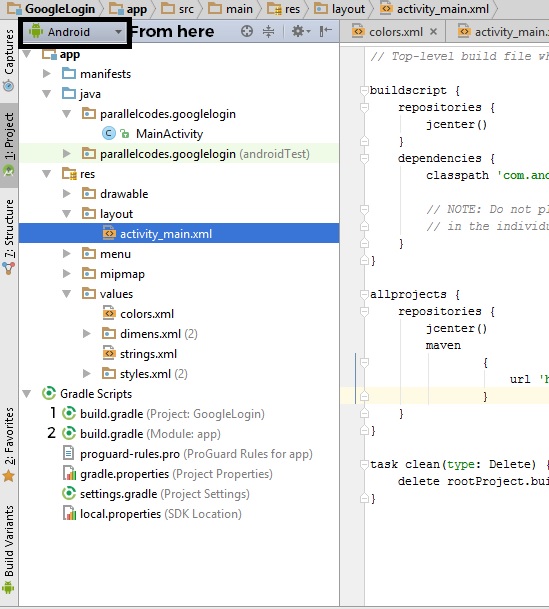
In your Android Studio create a new Project with
Package name : parallelcodes.login
Application name : GoogleLogin
To generate your API key which is necessary to use in our Project (Google Login in our Android Project will not work unless API key is generated with the Package name SHA1 key of your Project) visit :
Google Developer Console with your Google Account Sign In
The Process of obtaining the API Key is explained in the video Above.
Open your Project build.gradle and make changes in the allprojects as below :
No 1. build.gradle (Project: GoogleLogin)
// Top-level build file where you can add configuration options common to all sub-projects/modules.

buildscript {
repositories {
jcenter()
}
dependencies {
classpath 'com.android.tools.build:gradle:1.5.0'

// NOTE: Do not place your application dependencies here; they belong
// in the individual module build.gradle files
}
}

allprojects {
repositories {
jcenter()
maven
{
url 'https://maven.google.com'
}
}
}

task clean(type: Delete) {
delete rootProject.buildDir
}
In build.gradle (module: app) add play-services dependencies as below :
No 2. build.gradle (module: app):
apply plugin: 'com.android.application'

android {
compileSdkVersion 26
buildToolsVersion "24.0.0"

defaultConfig {
applicationId "parallelcodes.login"
minSdkVersion 15
targetSdkVersion 26
versionCode 1
versionName "1.0"
}
buildTypes {
release {
minifyEnabled false
proguardFiles getDefaultProguardFile('proguard-android.txt'), 'proguard-rules.pro'
}
}
}

dependencies {
compile fileTree(dir: 'libs', include: ['*.jar'])
testCompile 'junit:junit:4.12'
compile 'com.android.support:appcompat-v7:26.0.0-alpha1'
compile 'com.android.support:design:26.0.0-alpha1'
compile 'com.google.android.gms:play-services-auth:11.6.0'
}
Now Sync your Project or build your Project once.
Edit the activity_main.xml layout file as below :
activity_main.xml:
<?xml version="1.0" encoding="utf-8"?>

<LinearLayout xmlns:android="http://schemas.android.com/apk/res/android"
xmlns:app="http://schemas.android.com/apk/res-auto"
android:layout_width="match_parent"
android:layout_height="match_parent"
android:orientation="vertical">

<TextView
android:id="@+id/lblHeader"
android:layout_width="wrap_content"
android:layout_height="wrap_content"
android:layout_gravity="center_horizontal"
android:layout_marginBottom="10dp"
android:layout_marginTop="20dp"
android:gravity="center"
android:text="Android Login with Google"
android:textColor="#e3314b"
android:textSize="25sp" />

<ImageView
android:id="@+id/imgProfilePic"
android:layout_width="150dp"
android:layout_height="150dp"
android:layout_gravity="center_horizontal"
android:layout_margin="10dp"
android:src="@drawable/ic_lock" />

<TextView
android:id="@+id/lblInfo"
android:layout_width="wrap_content"
android:layout_height="wrap_content"
android:layout_margin="10dp"
android:textColor="#000"
android:textSize="16sp" />
<LinearLayout
android:layout_width="match_parent"
android:layout_height="wrap_content"
android:layout_margin="10dp"
android:weightSum="1"
android:orientation="vertical">

<com.google.android.gms.common.SignInButton
android:id="@+id/btnLogin"
android:layout_weight="1"
android:layout_width="wrap_content"
android:layout_height="wrap_content"
android:layout_gravity="center_horizontal" />

<Button
android:id="@+id/btnLogout"
android:layout_weight="1"
android:layout_gravity="center_horizontal"
android:layout_width="wrap_content"
android:layout_height="wrap_content"
android:text="Logout" />
</LinearLayout>
</LinearLayout>
Download the below icon and rename it as ic_lock.png and place it in your res>drawable folder:
Edit your MainActivity.java file as below :
MainActivity.java:
package parallelcodes.login;

import android.content.Intent;
import android.graphics.Bitmap;
import android.graphics.BitmapFactory;
import android.os.AsyncTask;
import android.os.Bundle;
import android.support.annotation.NonNull;
import android.support.design.widget.FloatingActionButton;
import android.support.design.widget.Snackbar;
import android.support.v7.app.AppCompatActivity;
import android.support.v7.widget.Toolbar;
import android.util.Log;
import android.view.View;
import android.view.Menu;
import android.view.MenuItem;
import android.widget.Button;
import android.widget.ImageView;
import android.widget.TextView;
import android.widget.Toast;

import com.google.android.gms.auth.api.signin.GoogleSignIn;
import com.google.android.gms.auth.api.signin.GoogleSignInAccount;
import com.google.android.gms.auth.api.signin.GoogleSignInClient;
import com.google.android.gms.auth.api.signin.GoogleSignInOptions;
import com.google.android.gms.common.SignInButton;
import com.google.android.gms.common.api.ApiException;
import com.google.android.gms.tasks.OnCompleteListener;
import com.google.android.gms.tasks.Task;

import java.io.InputStream;
import java.net.URL;

public class MainActivity extends AppCompatActivity {
GoogleSignInClient mGoogleSignInClient;
TextView lblInfo, lblHeader;
ImageView imgProfilePic;
SignInButton btnLogin;
Button btnLogout;
GoogleSignInOptions gso;
GoogleSignInAccount account;

@Override
protected void onCreate(Bundle savedInstanceState) {
super.onCreate(savedInstanceState);
setContentView(R.layout.activity_main);

lblInfo = (TextView) findViewById(R.id.lblInfo);
lblHeader = (TextView) findViewById(R.id.lblHeader);

imgProfilePic = (ImageView) findViewById(R.id.imgProfilePic);
btnLogin = (SignInButton) findViewById(R.id.btnLogin);
btnLogout = (Button) findViewById(R.id.btnLogout);

gso = new GoogleSignInOptions.Builder(GoogleSignInOptions.DEFAULT_SIGN_IN)
.requestEmail()
.build();

mGoogleSignInClient = GoogleSignIn.getClient(MainActivity.this, gso);

account = GoogleSignIn.getLastSignedInAccount(MainActivity.this);
if (account != null)
updateUI(account);
else
btnLogout.setVisibility(View.GONE);

btnLogin.setOnClickListener(new View.OnClickListener() {
@Override
public void onClick(View view) {
signIn();
}
});

btnLogout.setOnClickListener(new View.OnClickListener() {
@Override
public void onClick(View view) {
signOut();
}
});
}

private void updateUI(GoogleSignInAccount account) {
try {

String strData = "Name : " + account.getDisplayName()
+ "\r\nEmail : " + account.getEmail() + "\r\nGiven name : " + account.getGivenName()
+ "\r\nDisplay Name : " + account.getDisplayName() + "\r\nId : "
+ account.getId();
//+ "\r\nImage URL : " + account.getPhotoUrl().toString();
//+ "\r\nAccount : " + account.getAccount().toString()
lblInfo.setText(strData);

Log.d("Image URL : ", account.getPhotoUrl().toString());
Log.d("Login Data : ", strData);
new DownloadImageTask((ImageView) findViewById(R.id.imgProfilePic))
.execute(account.getPhotoUrl().toString());

lblHeader.setText("Sign In with Google Successful");
btnLogin.setVisibility(View.GONE);
btnLogout.setVisibility(View.VISIBLE);

} catch (NullPointerException ex) {
lblInfo.setText(lblInfo.getText().toString() + "\r\n" + "NullPointerException : " + ex.getMessage().toString());
} catch (RuntimeException ex) {
lblInfo.setText(lblInfo.getText().toString() + "\r\n" + "RuntimeException : " + ex.getMessage().toString());
} catch (Exception ex) {
// lblInfo.setText(ex.getMessage().toString());
}
}

private class DownloadImageTask extends AsyncTask<String, Void, Bitmap> {
ImageView bmImage;

public DownloadImageTask(ImageView bmImage) {
this.bmImage = bmImage;
}

protected Bitmap doInBackground(String... urls) {
String urldisplay = urls[0];
Bitmap mIcon11 = null;
try {
InputStream in = new java.net.URL(urldisplay).openStream();
mIcon11 = BitmapFactory.decodeStream(in);
} catch (Exception e) {
Log.e("Error", e.getMessage());
e.printStackTrace();
}
return mIcon11;
}

protected void onPostExecute(Bitmap result) {
bmImage.setImageBitmap(result);
}
}

private void signIn() {
Intent signInIntent = mGoogleSignInClient.getSignInIntent();
startActivityForResult(signInIntent, 1);
}

@Override
public void onActivityResult(int requestCode, int resultCode, Intent data) {
super.onActivityResult(requestCode, resultCode, data);

if (requestCode == 1) {
Task<GoogleSignInAccount> task = GoogleSignIn.getSignedInAccountFromIntent(data);
handleSignInResult(task);
}
}

private void handleSignInResult(Task<GoogleSignInAccount> completedTask) {
try {
GoogleSignInAccount account = completedTask.getResult(ApiException.class);

updateUI(account);
} catch (ApiException e) {
Log.w("Google Error ", "signInResult:failed code=" + e.getStatusCode());
}
}

private void signOut() {
mGoogleSignInClient.signOut()
.addOnCompleteListener(this, new OnCompleteListener<Void>() {
@Override
public void onComplete(@NonNull Task<Void> task) {
// ...
revokeAccess();
}
});
}

private void revokeAccess() {
mGoogleSignInClient.revokeAccess()
.addOnCompleteListener(this, new OnCompleteListener<Void>() {
@Override
public void onComplete(@NonNull Task<Void> task) {
// ...
lblInfo.setText("Please Login.");
lblHeader.setText("Android Login with Google");
btnLogin.setVisibility(View.VISIBLE);
btnLogout.setVisibility(View.GONE);
//imgProfilePic.setBackgroundResource(R.drawable.ic_lock);
imgProfilePic.setImageDrawable(getResources().getDrawable(R.drawable.ic_lock, null));
}
});
}
}
To get Internet permissions, add permissions in your Manifest file as below :
AndroidManifest.xml:
<?xml version="1.0" encoding="utf-8"?>
<manifest xmlns:android="http://schemas.android.com/apk/res/android"
package="parallelcodes.login">

<uses-permission android:name="android.permission.INTERNET" />
<uses-permission android:name="android.permission.ACCESS_NETWORK_STATE" />
<uses-permission android:name="android.permission.ACCESS_WIFI_STATE" />

<application
android:allowBackup="true"
android:icon="@mipmap/ic_launcher"
android:label="@string/app_name"
android:supportsRtl="true"
android:theme="@style/AppTheme">
<activity
android:name=".MainActivity"
android:label="@string/app_name"
android:theme="@style/AppTheme">
<intent-filter>
<action android:name="android.intent.action.MAIN" />

<category android:name="android.intent.category.LAUNCHER" />
</intent-filter>
</activity>
</application>

</manifest>
References :
Google Android Official Documentation.
Stack Overflow for Image Async Task.
Download Source code for this Application – Password “parallelcodes”.
Thank You.
Pingback: Android Login To Google Account - Login Portal
Pingback: Android App Google Login - Login Portal
Pingback: Android Login With Google Account Example - Login Portal
Pingback: Login Google Account Programmatically - LoginPP
Pingback: Www login gmail android studio Sign In Your Online Account - loginrecords.com
Pingback: Https android login using google account Portal Guide Instructions Help - centtip.com
Pingback: Https android studio login activity gmail api Portal Guide Instructions Help - centtip.com
Pingback: login with gmail in android studio in September 2022 - Login Directly
Pingback: Android Studio Gmail Login - My Blog