Android Swipe Views with Tabs (Custom Designs and Color)
Android Navigation tabs with swipe wipe and design
This post is about making Android Navigation tabs with dynamic colors.
First create a new application in android studio with name AndroidTabActivity
Make a new layout file in res > layout > folder with name tabparent.xml
and edit it as following :
<?xml version="1.0" encoding="utf-8"?>
<android.support.v4.view.ViewPager xmlns:android="http://schemas.android.com/apk/res/android"
android:id="@+id/pager"
android:layout_width="match_parent"
android:layout_height="match_parent" />
This file will be holding the Navigation tab.
Make a new file in same layout folder with name tabone.xml
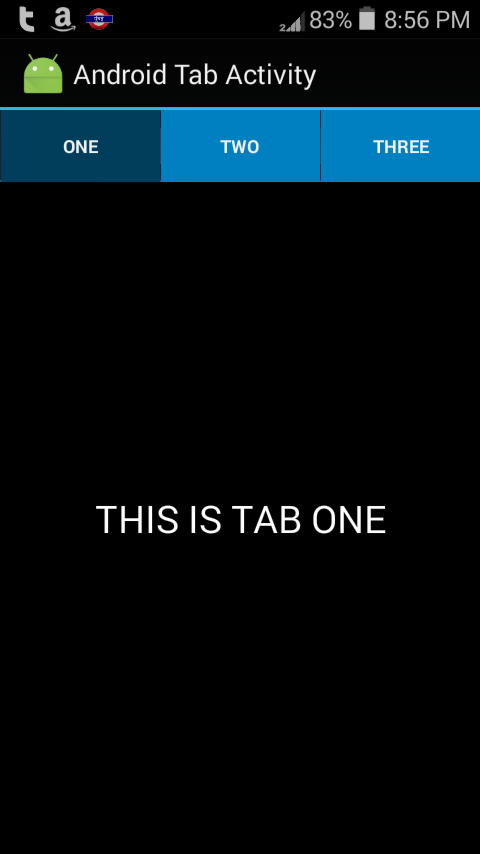
<?xml version="1.0" encoding="utf-8"?>
<LinearLayout xmlns:android="http://schemas.android.com/apk/res/android"
android:layout_width="match_parent"
android:layout_height="match_parent"
android:background="#000000">

<TextView
android:id="@+id/textView"
android:layout_width="match_parent"
android:layout_height="match_parent"
android:gravity="center"
android:textSize="25sp"
android:textColor="#ffffff"
android:text="TAB ONE" />

</LinearLayout>
This file is for tab one layout in navigation tab.
In same way two more files with name tabtwo and tabthree for second and third tab layout.
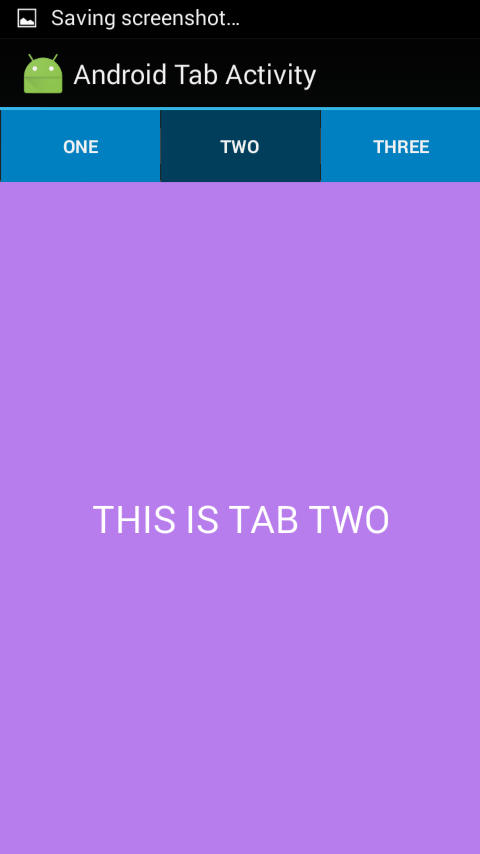
tabtwo.xml
<?xml version="1.0" encoding="utf-8"?>
<LinearLayout xmlns:android="http://schemas.android.com/apk/res/android"
android:layout_width="match_parent"
android:layout_height="match_parent"
android:orientation="vertical"
android:background="#ffb87dec">

<TextView
android:id="@+id/textView"
android:layout_width="match_parent"
android:layout_height="match_parent"
android:gravity="center"
android:textSize="25sp"
android:textColor="#ffffff"/>

</LinearLayout>
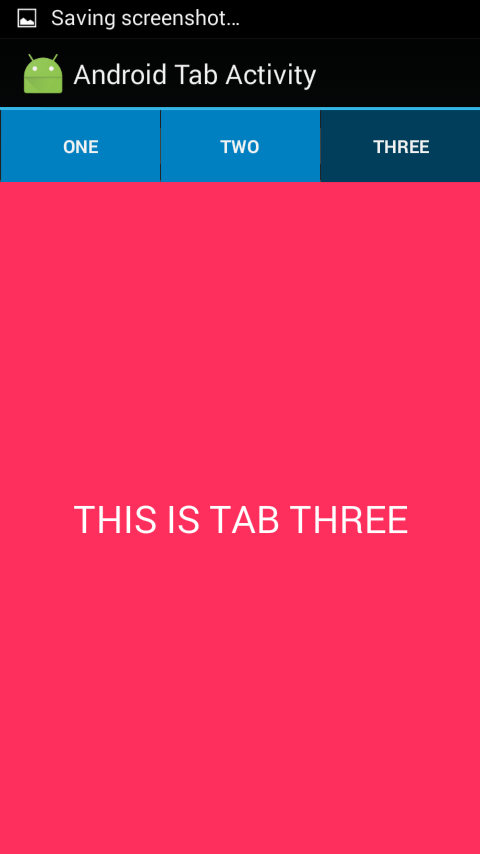
tabthree.xml
<?xml version="1.0" encoding="utf-8"?>
<LinearLayout xmlns:android="http://schemas.android.com/apk/res/android"
android:layout_width="match_parent"
android:layout_height="match_parent"
android:orientation="vertical"
android:background="#ffff2f5d">

<TextView
android:id="@+id/textView"
android:layout_width="match_parent"
android:layout_height="match_parent"
android:gravity="center"
android:textSize="25sp"
android:textColor="#ffffff"/>

</LinearLayout>
Now you will have to make drawable resources so that we can customize our tabs
I found this from official post which you can find here Styling the Action Bar.
Create a new Drawable resource file. you can create it by right clicking the drawable folder and selecting new > Drawable resource file.
Name : tab_selected
Edit it as following :
<?xml version="1.0" encoding="utf-8"?>
<color xmlns:android="http://schemas.android.com/apk/res/android"
android:color="#003e5b" >

</color>
Create new drawable resource file with name tab_selected_focused.xml
And edit it as following :
<?xml version="1.0" encoding="utf-8"?>
<color xmlns:android="http://schemas.android.com/apk/res/android"
android:color="#810306" >

</color>
Create new drawable resource file with name tab_selected_pressed.xml
And edit it as following :
<?xml version="1.0" encoding="utf-8"?>
<color xmlns:android="http://schemas.android.com/apk/res/android"
android:color="#00592d" >

</color>
Create new drawable resource file with name tab_unselected.xml
And edit it as following :
<?xml version="1.0" encoding="utf-8"?>
<color xmlns:android="http://schemas.android.com/apk/res/android"
android:color="#0080c0" >

</color>
Create new drawable resource file with name tab_unselected_focused.xml
And edit it as following :
<?xml version="1.0" encoding="utf-8"?>
<color xmlns:android="http://schemas.android.com/apk/res/android"
android:color="#f8070e" >

</color>
Create new drawable resource file with name tab_unselected_pressed.xml
And edit it as following :
<?xml version="1.0" encoding="utf-8"?>
<color xmlns:android="http://schemas.android.com/apk/res/android"
android:color="#38af53" >

</color>
Now the last important drawable file.
Create a new drawable file with name : actionbar_tab_indicator.xml
and edit it as following
<?xml version="1.0" encoding="utf-8"?>
<selector xmlns:android="http://schemas.android.com/apk/res/android">

<!-- STATES WHEN BUTTON IS NOT PRESSED -->

<!-- Non focused states -->
<item android:drawable="@drawable/tab_unselected" android:state_focused="false" android:state_pressed="false" android:state_selected="false"/>
<item android:drawable="@drawable/tab_selected" android:state_focused="false" android:state_pressed="false" android:state_selected="true"/>

<!-- Focused states (such as when focused with a d-pad or mouse hover) -->
<item android:drawable="@drawable/tab_unselected_focused" android:state_focused="true" android:state_pressed="false" android:state_selected="false"/>
<item android:drawable="@drawable/tab_selected_focused" android:state_focused="true" android:state_pressed="false" android:state_selected="true"/>

<!-- STATES WHEN BUTTON IS PRESSED -->

<!-- Non focused states -->
<item android:drawable="@drawable/tab_unselected_pressed" android:state_focused="false" android:state_pressed="true" android:state_selected="false"/>
<item android:drawable="@drawable/tab_selected_pressed" android:state_focused="false" android:state_pressed="true" android:state_selected="true"/>

<!-- Focused states (such as when focused with a d-pad or mouse hover) -->
<item android:drawable="@drawable/tab_unselected_pressed" android:state_focused="true" android:state_pressed="true" android:state_selected="false"/>
<item android:drawable="@drawable/tab_selected_pressed" android:state_focused="true" android:state_pressed="true" android:state_selected="true"/>

</selector>
This file explains all the drawable files we created previously.
Now open styles.xml and edit it as following :
<resources>

<!--
Base application theme for API 14+. This theme completely replaces
AppBaseTheme from BOTH res/values/styles.xml and
res/values-v11/styles.xml on API 14+ devices.
-->
<style name="AppBaseTheme" parent="Theme.AppCompat.Light.DarkActionBar">
<!-- API 14 theme customizations can go here. -->
</style>

<style name="MyAppTheme" parent="@android:style/Theme.Holo">

<item name="android:actionBarTabStyle">@style/MyActionBarTabs</item>
</style>

<!-- ActionBar tabs styles -->
<style name="MyActionBarTabs" parent="@android:style/Widget.Holo.ActionBar.TabView">

<!-- tab indicator -->
<item name="android:background">@drawable/actionbar_tab_indicator</item>
</style>
</resources>
Here’s the AndroidManifest.xml file
<?xml version="1.0" encoding="utf-8"?>
<manifest xmlns:android="http://schemas.android.com/apk/res/android"
package="androidtabactivity.demo" >

<application
android:allowBackup="true"
android:icon="@mipmap/ic_launcher"
android:label="@string/app_name"
android:theme="@style/MyAppTheme" >
<activity
android:name=".MainActivity"
android:label="@string/app_name" >
<intent-filter>
<action android:name="android.intent.action.MAIN" />

<category android:name="android.intent.category.LAUNCHER" />
</intent-filter>
</activity>
</application>

</manifest>
Create a new Class with name TabAdapter.java
package androidtabactivity.demo;

/**
* Created by abc on 28/4/2015.
*/

import android.support.v4.app.Fragment;
import android.support.v4.app.FragmentManager;
import android.support.v4.app.FragmentPagerAdapter;

public class TabAdapter extends FragmentPagerAdapter {

public TabAdapter(FragmentManager fm) {
super(fm);
}

@Override
public Fragment getItem(int index) {

switch (index) {
case 0:

return new TabOne();
case 1:

return new TabTwo();
case 2:

return new TabThree();
}

return null;
}

@Override
public int getCount() {
// no. of tabs here i.e. TAB ONE, TAB TWO, TAB THREE
return 3;
}

}
For displaying our three tabs make three classes with name
TabOne.java, TabTwo.java, TabThree.java
package androidtabactivity.demo;

import android.os.Bundle;
import android.support.v4.app.Fragment;
import android.view.LayoutInflater;
import android.view.View;
import android.view.ViewGroup;
import android.widget.TextView;

/**
* Created by abc on 28/4/2015.
*/
public class TabOne extends Fragment {
TextView txtone;

@Override
public View onCreateView(LayoutInflater inflater, ViewGroup container,
Bundle savedInstanceState) {

View myView = inflater.inflate(R.layout.tabone, container, false); // just change here with the corresponding layout resource file
txtone = ((TextView) myView.findViewById(R.id.textView));
txtone.setText("THIS IS TAB ONE"); //edit this as - THIS IS TAB TWO and THIS IS TAB THREE for two more files
return myView;

}
}
Now open the MainActivity.java
and edit it as following :
package androidtabactivity.demo;

import android.app.ActionBar;
import android.app.ActionBar.Tab;
import android.app.FragmentTransaction;
import android.os.Bundle;
import android.support.v4.app.FragmentActivity;
import android.support.v4.view.ViewPager;

public class MainActivity extends FragmentActivity implements
ActionBar.TabListener {

String[] mytabnames = { "ONE", "TWO", "THREE" };
ViewPager myviewpager;
TabAdapter tabadapter;
ActionBar actionBar;
// Tab titles

@Override
protected void onCreate(Bundle savedInstanceState) {
super.onCreate(savedInstanceState);
setContentView(R.layout.tabparent);

// Initilization
myviewpager = (ViewPager) findViewById(R.id.pager);
actionBar = getActionBar();
tabadapter = new TabAdapter(getSupportFragmentManager());

myviewpager.setAdapter(tabadapter);
actionBar.setHomeButtonEnabled(true);
actionBar.setNavigationMode(ActionBar.NAVIGATION_MODE_TABS);

// Adding Tabs
for (String tab_name : mytabnames) {
actionBar.addTab(actionBar.newTab().setText(tab_name)
.setTabListener(this));
}

/**
* on swiping the viewpager make respective tab selected
* */
myviewpager.setOnPageChangeListener(new ViewPager.OnPageChangeListener() {

@Override
public void onPageSelected(int position) {
// on changing the page
// make respected tab selected
actionBar.setSelectedNavigationItem(position);
}

@Override
public void onPageScrolled(int arg0, float arg1, int arg2) {
}

@Override
public void onPageScrollStateChanged(int arg0) {
}
});
}

@Override
public void onTabReselected(Tab tab, FragmentTransaction ft) {
}

@Override
public void onTabSelected(Tab tab, FragmentTransaction ft) {
// on tab selected
// show respected fragment view
myviewpager.setCurrentItem(tab.getPosition());
}

@Override
public void onTabUnselected(Tab tab, FragmentTransaction ft) {
}

}
Now run the application. 🙂 🙂
If you like my work, please click the like button and like my page on facebook. You can also comment below…I will try my best to help you out.